Getting perfect prints from an FDM 3D printer is rarely a plug-and-play experience. Even the most advanced, expensive printers require precise configuration to match the unique characteristics of different filaments. From dimensional accuracy and layer bonding to overhangs and stringing, several mechanical and thermal variables must be balanced. In this guide, we will explore the best 3D print quality tests, how to run them, and how to analyze their results to calibrate your printer for professional-grade results.
As the owner of 3D Print Book, I operate a dedicated FDM printing studio. Unlike resin-based SLA processes, FDM utilizes physical thermoplastic filaments—such as PLA, PETG, ABS, and TPU—which behave differently under heating, extrusion pressure, and cooling cycles. Over the years, I have calibrated dozens of machines to print structural prototypes, functional enclosures, and mechanical assemblies. Through this hands-on experience, I have developed a structured workflow for calibrating FDM printers. Let us walk through the fundamental concepts and tools required to make your 3D printer perform at its absolute best.
1. What is a 3D Print Quality Test?
A 3D print quality test is a specialized model designed to evaluate a printer's performance in bridging, retraction, dimensional accuracy, and overhangs. Instead of printing a large, complex model that might fail after several hours, calibration tests are small, fast, and dense with geometric features that challenge specific mechanics of the extrusion system.
When you run a 3d print quality test, you are not just looking for a successful print; you are looking for specific indicators of physical performance. A well-designed calibration test will systematically isolate different aspects of the printing process:
- Dimensional Accuracy: Evaluates whether a printed part matches its exact CAD dimensions (e.g., if a 20mm cube actually measures 20.00mm in all directions). This is critical for interlocking assemblies.
- Retraction and Stringing: Tests the extruder's ability to stop filament flow when moving across open space, preventing thin whiskers or hairs of plastic from forming between parts.
- Bridging Capability: Measures how well the printer extrudes filament across a gap without any support material underneath. Good bridging requires optimal print speed, extrusion temperature, and active cooling fan speeds.
- Overhang Performance: Tests the limits of printing at steep angles (from 45 to 70 degrees) where subsequent layers are partially printed in mid-air.
- First Layer and Bed Adhesion: Evaluates whether the bed leveling is accurate and if the nozzle is at the correct Z-offset distance from the build plate.
By understanding what these tests reveal, you can save hours of troubleshooting, minimize wasted filament, and prevent print failures on larger projects.
2. Top Test Models for FDM Calibration
Use the 3DBenchy for overall benchmarking, a 20mm calibration cube for dimensional accuracy, and temperature towers to find filament sweet spots. Different test models serve different purposes, and running the right test at the right time is key to an efficient calibration workflow.
Let's examine the most reliable, industry-standard calibration models used to test and calibrate FDM printers today.
1. The 3DBenchy (The Classic Benchmark)
The 3DBenchy is a small boat model that has become the undisputed standard benchmark for 3D printing. Despite its friendly appearance, the Benchy is a torture test packed with challenging features. It tests overhangs (the bow of the boat), bridging (the cabin roof and window frames), circular dimensions (the hawsepipe), vertical alignment, and flat surface finishes. Furthermore, it contains high-detail elements like the nameplate on the stern, which tests the printer's resolution and font rendering.
A 3DBenchy should be printed at standard settings whenever you set up a new printer or make major hardware upgrades. It provides a visual overview of how well the machine handles a mix of geometric geometries, highlighting areas that need more isolated testing.
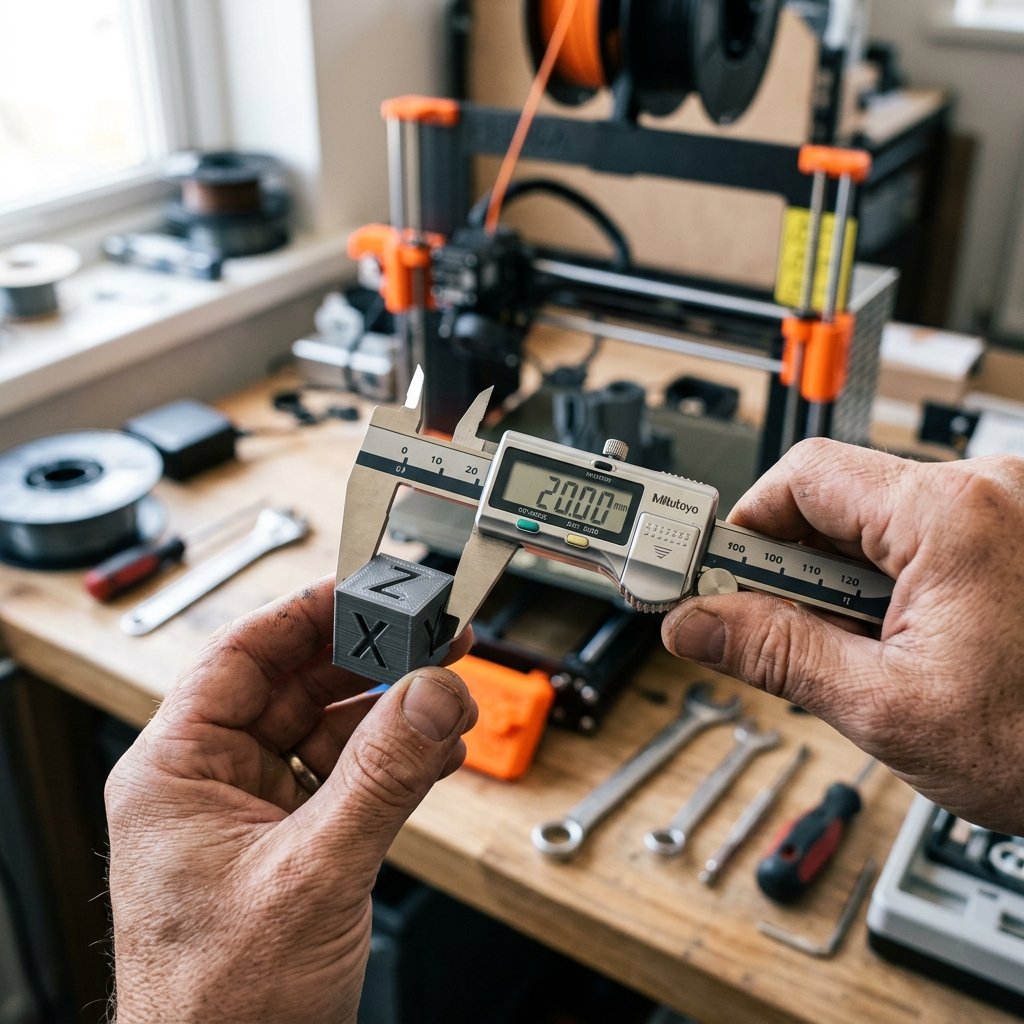
2. The 20mm Calibration Cube
The 20mm calibration cube is a simple, hollow or low-infill cube with the letters X, Y, and Z engraved on its faces. Its primary purpose is to test the dimensional accuracy of your printer. By measuring the physical printed cube with digital calipers, you can determine if your stepper motors, belts, and extrusion flow rate are configured correctly. It is also excellent for checking layer alignment, ghosting (vibrations around the engraved letters), and top-layer infill density.
3. Temperature Towers (Temp Towers)
Every roll of filament—even of the same material and brand—has a unique optimal printing temperature. A temperature tower is a vertical model divided into stacked segments, each printed at a progressively lower or higher temperature. Slicing software is configured to modify the hotend temperature at the start of each segment.
By inspecting the completed tower, you can easily identify the temperature that produces the best layer adhesion, the cleanest bridging, the least stringing, and the glossiest or most matte finish. PLA typically prints best between 190°C and 220°C, PETG between 230°C and 250°C, and ABS between 240°C and 260°C.
4. Retraction and Stringing Tests
Retraction tests usually consist of two or more vertical pins or towers separated by a gap of 20 to 50mm. As the nozzle moves back and forth between these pins, it must retract the filament to prevent oozing. If your retraction distance or speed is too low, you will see thin stringing (often called spider webs) or small blobs (zits) on the sides of the towers. If retraction is too high, you may experience under-extrusion or nozzle clogs due to air being pulled into the hotend.
5. All-in-One Torture Tests
For a comprehensive evaluation, many operators use an all-in-one torture test. These compact models combine overhang angles (slopes from 30 to 70 degrees), bridges of various lengths, small pillars, cylindrical holes, and thin walls into a single print. While these models take longer to print than a simple cube, they provide a complete health check of your slicing profile in a single pass.
"When calibrating, never change multiple variables at once. If your test show issues with both stringing and overhangs, adjust your temperature first. A lower printing temperature often resolves stringing and improves overhang overhang performance simultaneously without touching retraction settings." — Dinu Suciu, Lead Technician at 3D Print Book
Comparison of Calibration Models
To help you choose the right model for your current tuning needs, here is a comparison matrix of the primary calibration tests:
| Test Model | Primary Target Check | Print Time (Approx.) | Difficulty of Analysis | Recommended Usage |
|---|---|---|---|---|
| 3DBenchy | General benchmarking & overhangs | 45 - 90 minutes | Moderate (visual inspection) | When setting up a new printer or major firmware upgrade |
| 20mm Calibration Cube | Dimensional accuracy & ghosting | 20 - 40 minutes | Easy (requires calipers) | When checking tolerances or adjusting extrusion multiplier |
| Temperature Tower | Optimal printing temperature | 40 - 60 minutes | Easy (visual comparison of segments) | Every time you open a new roll/brand of filament |
| Retraction Towers | Stringing and oozing prevention | 15 - 30 minutes | Easy (identifying whiskers/blobs) | When switching filament materials (e.g., PLA to PETG) |
| All-in-One Torture Test | Overhangs, bridging, details, & limits | 1.5 - 3 hours | Hard (requires detailed inspection of 5+ features) | Final verification of a new slicing profile |
3. How to Analyze Calibration Test Results
Measure dimensions with calipers to correct E-steps, inspect stringing to tune retraction, and check bridging sections to adjust cooling. Analyzing calibration results requires a systematic approach to identify mechanical faults versus slicing errors.
Analyzing the 20mm Calibration Cube
When your calibration cube finishes printing, let it cool completely before removing it from the bed, as warm plastic can distort under pressure. Use a digital caliper to measure the cube across its three axes:
- X-Axis (Left to Right): If the measurement is larger than 20.00mm (e.g., 20.20mm), you may be over-extruding, or your slicing software's "horizontal expansion" needs adjustment. If it is smaller (e.g., 19.80mm), you may be under-extruding or experiencing belt slip.
- Y-Axis (Front to Back): Similar to the X-axis, discrepancies here point to extrusion rates or belt tension. Check if the belt is loose, as this can cause the letters to look skewed or distorted.
- Z-Axis (Vertical): If the Z-axis is too short, your first layer may be squished too much (bed leveling or Z-offset is too low), or your Z-axis lead screw is binding.
A very common mistake in the 3D printing community is adjusting the step-per-millimeter (steps/mm) of the X, Y, or Z stepper motors in the printer's firmware to correct for dimensional errors on a printed cube. Stepper motor steps/mm are defined by the physical geometry of your hardware—such as the pitch of the lead screw or the number of teeth on the drive pulleys. If you modify these based on a printed cube, a larger print will scale the error proportionally. Instead, adjust the extrusion multiplier (flow rate) in your slicer to tune dimensional accuracy.
Analyzing Temperature Towers
When evaluating a printed temperature tower, start from the bottom (highest temperature) and inspect each segment as you go up. Look for the following defects:
- Stringing: At higher temperatures, filament becomes less viscous and flows out of the nozzle easily, leading to heavy stringing. Find the temperature range where stringing disappears.
- Bridging: Check the horizontal spans. If the filament is too hot, it will sag or droop. A cooler temperature allows the extruded plastic to solidify quickly, maintaining a straight bridge.
- Overhangs: Look at the curved or sloped features. If the temperature is too high, the layers will curl upward, leading to rough surfaces or potential head crashes.
- Layer Strength: Try to break the tower by applying pressure to the segments. At very low temperatures, layers do not bond well, and the parts will break easily. You must find the balance between clean appearance and physical strength.
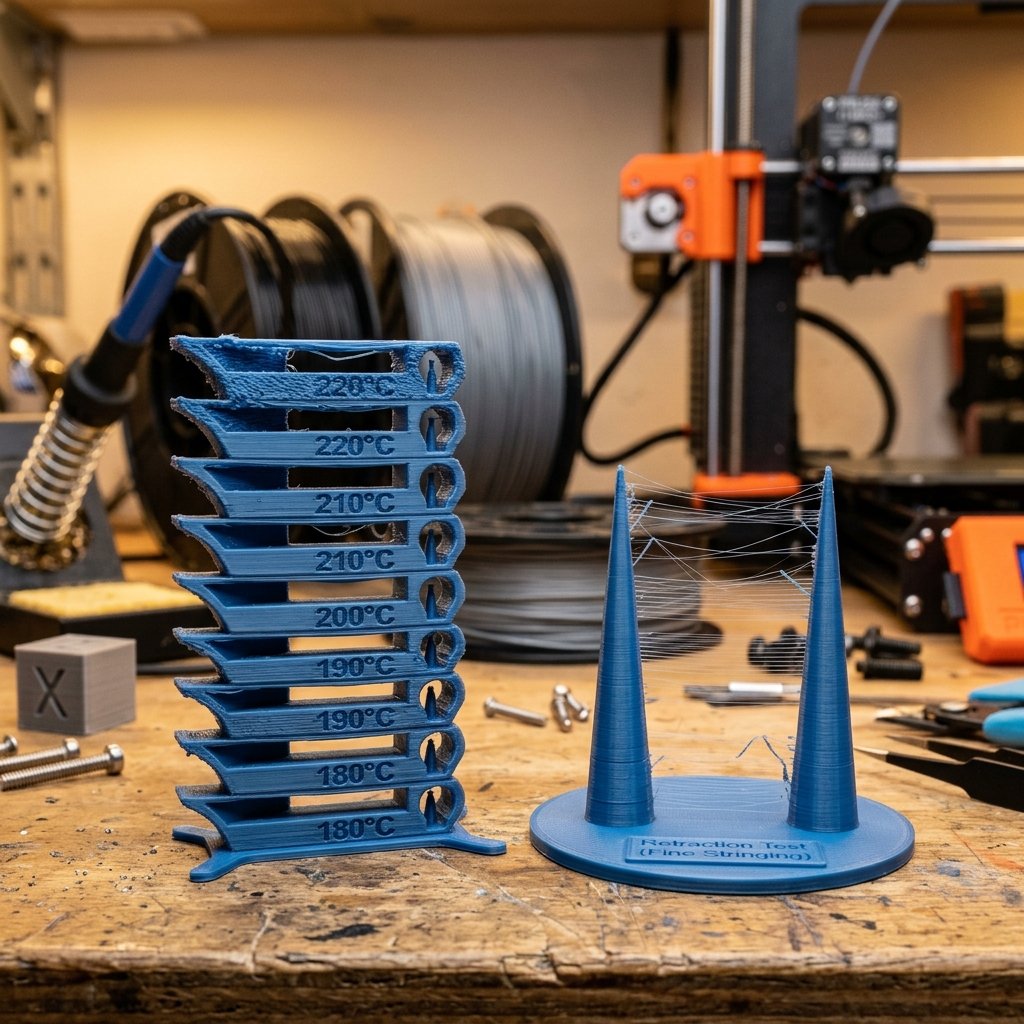
Analyzing Retraction and Stringing Tests
If your retraction test has thin, hair-like strings, it is typically a sign of slight oozing. This can be resolved by increasing the retraction distance by 0.5mm increments or raising the retraction speed slightly. If you see thick strings or blobs, your print temperature is likely too high, or the filament has absorbed moisture from the air. In FDM printing, wet filament is one of the most common causes of stringing; when heated, the moisture in the filament turns to steam, creating pressure that forces plastic out of the nozzle regardless of retraction.
4. Advanced Calibration: E-Steps and Flow Rate
For structural parts and tight tolerances, physical calibration of the extruder assembly is required before tuning slicer settings. This involves calibrating the E-steps and the flow rate to ensure the printer extrudes the exact amount of plastic requested.
Calibrating Extruder Steps (E-Steps)
E-steps calibration ensures that when the printer commands the extruder motor to feed 100mm of filament, exactly 100mm enters the hotend. To calibrate your E-steps:
- Heat your hotend to the printing temperature of your filament (e.g., 200°C for PLA).
- Use calipers to measure 120mm of filament from the entry point of the extruder, and mark it with a fine-tip marker.
- Using the printer's control interface, command the extruder to feed exactly 100mm of filament at a slow speed (e.g., 100mm/min).
- Measure the distance from the extruder entry point to your mark. If the extruder is perfectly calibrated, the remaining distance should be exactly 20mm (meaning 100mm was extruded).
- If the remaining distance is more than 20mm (under-extrusion) or less than 20mm (over-extrusion), calculate your new E-steps using the formula:
New E-steps = (Current E-steps * 100) / (120 - Remaining Distance) - Update the E-steps value in your printer's firmware (using M92 commands or the LCD menu) and save the settings.
Calibrating Flow Rate (Extrusion Multiplier)
While E-steps calibrate the physical movement of the extruder motor, the flow rate (or extrusion multiplier) is a slicer-level setting that accounts for the density, diameter tolerances, and behavior of specific filaments. To calibrate flow rate:
- Download or design a simple 30x30x30mm cube.
- Slice the cube in "Vase Mode" (spiralize outer contour) with a single wall line, 0% infill, and 0 top layers. Set your line width to a specific value (e.g., 0.40mm or 0.45mm).
- Print the cube and let it cool.
- Use calipers to measure the thickness of the four walls at their midpoint. Take the average of these measurements.
- If your average wall thickness differs from your sliced line width, adjust your flow rate using the formula:
New Flow Rate = (Target Wall Thickness / Measured Wall Thickness) * Current Flow Rate
💡 Expert Tip: Double-Check Your Bed Leveling First
Before you spend hours calibrating E-steps and flow rate, ensure your printer's bed leveling is correct. A poor first layer will skew all subsequent measurements. Use a paper test or a BLTouch sensor to get a uniform first layer, and set your Z-offset so that the plastic is slightly squished onto the bed without creating ridges or scratching the plate. For a step-by-step guide, read our comprehensive bed leveling guide.
5. Troubleshooting Common Issues Revealed by Quality Tests
Once you run these tests, you can use the visual errors to quickly diagnose and fix mechanical or settings-based printing issues. Here is a troubleshooting guide for the most common errors revealed by quality tests:
- Warping or Lifting at Corners: This indicates poor bed adhesion. Clean the print bed with isopropyl alcohol (IPA) to remove oils, check your bed leveling, and ensure the heated bed is at the correct temperature (typically 60°C for PLA, 70-80°C for PETG, and 100°C+ for ABS). For more details, consult our troubleshooting guide.
- Layer Shifting: A layer shift occurs when the printer's carriage loses alignment along the X or Y axis. Check that your belts are tight and tensioned correctly. Make sure the grub screws on the stepper motor pulleys are tight and that the print head does not collide with warped sections of the print.
- Ghosting or Ringing: These are ripples on the surface of the print, usually visible around sharp corners or embossed letters. Ghosting is caused by mechanical vibrations. Rigidify the table or surface your printer is on, check for loose carriage wheels, or reduce your acceleration and printing speed. If your firmware supports it, enable Input Shaping to dynamically compensate for these vibrations.
- Pillowing: This refers to small bumps or holes on the top flat surfaces of your print. Pillowing occurs when there is insufficient cooling or not enough top solid layers. Increase the part cooling fan speed or add 1-2 additional top layers in your slicer.
6. 3D Print Quality Calibration Checklist
To establish a reliable calibration routine, follow this sequential checklist. Each step builds on the accuracy of the previous one, ensuring you do not waste time tuning the wrong parameters:
- Mechanical Audit: Tighten belts, check carriage wheels for play, lubricate lead screws, and ensure the frame is square.
- Bed Leveling and Z-Offset: Calibrate the print bed flatness and set the correct nozzle height for a uniform first layer.
- Extruder E-Steps: Calibrate the physical feed rate of your extruder motor to ensure 100mm of commanded filament equals 100mm of actual extruded filament.
- Temperature Tower: Determine the optimal temperature for your filament brand to balance surface finish, bridging, and strength.
- Flow Rate (Extrusion Multiplier): Tune the slicer's flow multiplier using a single-walled print to achieve precise wall thickness.
- Retraction Tuning: Optimize retraction distance and speed to eliminate stringing and oozing.
- Final Validation: Print a 3DBenchy or an all-in-one torture test to verify the complete profile under realistic geometries.
7. Frequently Asked Questions (FAQ)
Q1: Why is my 3D print quality test showing severe stringing?
Severe stringing is typically caused by printing at too high a temperature, having insufficient retraction distance/speed, or using wet filament. Printing a temperature tower and retraction test will help isolate the correct settings. If these adjustments do not help, dry your filament using a dedicated filament dryer or a heated print bed covered by a cardboard box.
Q2: What is the correct Z-offset, and how does it affect bed leveling?
Z-offset is the distance between the hotend nozzle and the print bed at the home position. If the Z-offset is too high, the filament won't adhere to the bed, causing warping or print failures; if it is too low, the nozzle will scrape the bed, causing extruder slippage, flat first-layer squish, and potential nozzle clogs.
Q3: How often should I run a calibration test on my FDM printer?
You should run calibration tests whenever you switch to a new brand or type of filament, make mechanical modifications to your printer (like changing a nozzle, upgrading an extruder, or tightening belts), or notice a sudden decrease in print quality. Routine checks with a simple calibration cube every few months are also good practice.
Q4: Why are the dimensions of my calibration cube off by 0.2mm?
Dimensional discrepancies are usually caused by over-extrusion or incorrect step-per-millimeter (E-steps) calibration. Calibrating your extruder's E-steps and adjusting your slicing software's flow rate (extrusion multiplier) will resolve this. Also, ensure your belts are tensioned, as loose belts can cause slight elongation or backlash along the axes.
Q5: Should I calibrate my stepper motor steps/mm (X, Y, Z) using a calibration cube?
No. Stepper motor steps/mm for X, Y, and Z axes are based on physical belt and lead screw geometry. Adjusting them to match a printed cube will warp larger prints. Use extrusion multiplier and horizontal expansion settings instead. Only adjust step calculations if you change hardware, such as switching to different pulleys or lead screws with a different pitch.
About the Author: Dinu Suciu
I am Dinu Suciu, the lead technician and owner of 3D Print Book. Having run an FDM 3D printing studio for several years, I have specialized in functional manufacturing and custom component design. My focus is on helping engineers, designers, and hobbyists achieve high-precision parts using optimized FDM techniques. If you need assistance with custom printing orders, prototyping, or high-tolerance assemblies, please reach out to me directly through our contact page.