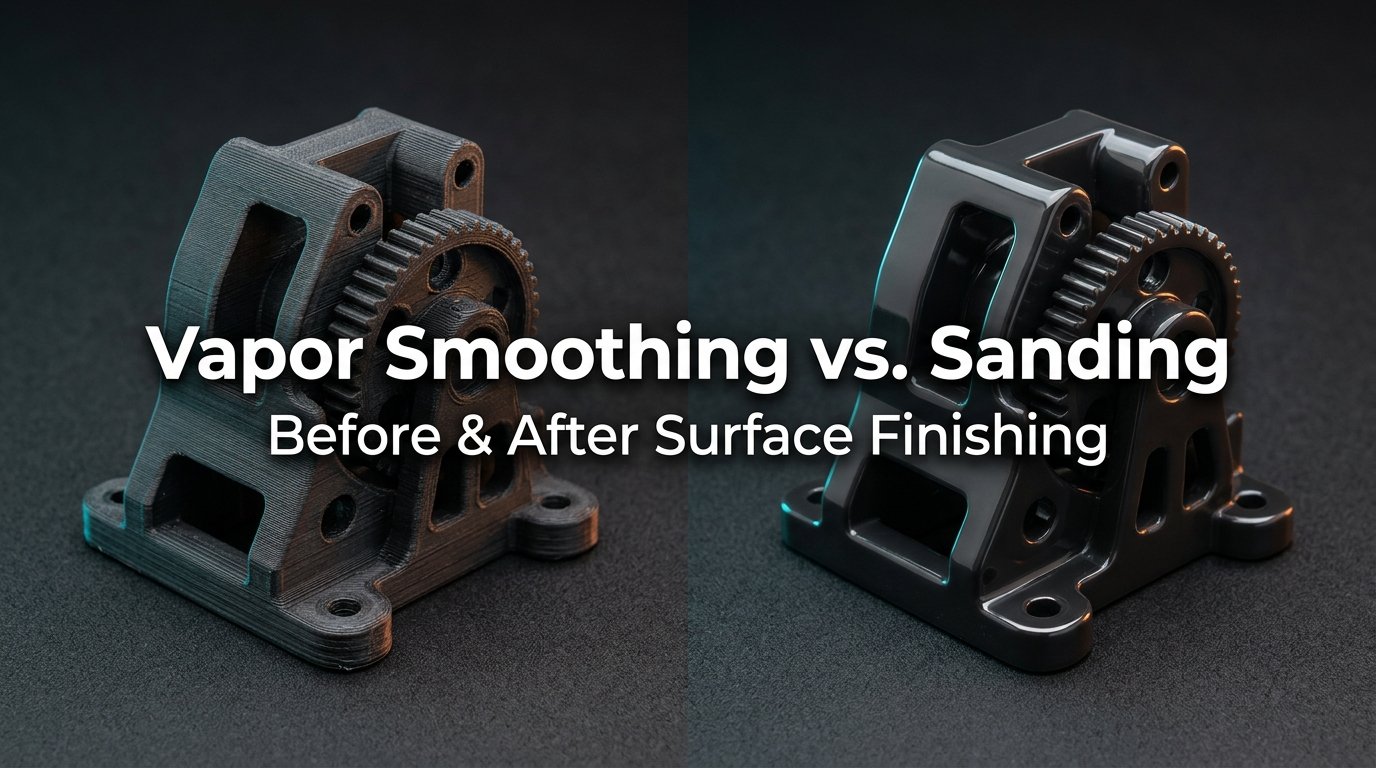
Fused Deposition Modeling (FDM) 3D printing is celebrated for its mechanical versatility, material options, and cost efficiency. However, even the most finely tuned FDM printers produce parts with visible layer lines, micro-staircasing on shallow curves, and anisotropic surface roughness. For functional brackets or internal enclosures, raw layer lines pose little issue. But for consumer prototypes, cosplay props, automotive trim pieces, or display models, post-processing is what converts raw plastic extrusions into professional objects that look like injection-molded parts.
In my workshop testing across multiple high-speed FDM platforms—including my Bambu Lab P1S and Creality K1—I have spent years testing both chemical and mechanical surface smoothing methods. Achieving a glossy, layer-free finish requires choosing the correct technique based on polymer solubility, part geometry, and safety constraints. While chemical vapor smoothing with solvents like Acetone or Ethyl Acetate can dissolve surface ridges on compatible polymers in minutes, non-reactive thermoplastics like standard PLA or PETG require a structured mechanical routine of progressive wet-sanding, high-build acrylic filler primers, and topcoats.
In this comprehensive guide, I will break down the polymer chemistry behind solvent dissolution, evaluate chemical solvent compatibility across popular FDM filaments, detail safe DIY cold vapor chamber protocols, walk through a step-by-step mechanical wet-sanding and priming routine, and analyze trade-offs in dimensional accuracy, structural strength, and waterproofing.
Table of Contents
- 1. Chemical Solvent Dissolution Mechanics: How Vapor Smoothing Works
- 2. Thermoplastic Solvent Compatibility Matrix: ABS, ASA, PLA, and PETG
- 3. Safe Cold Vapor and Hot Vapor Smoothing Protocols for ABS and ASA Prints
- 4. Mechanical Post-Processing Routine for Un-smoothable Filaments (PLA/PETG)
- 5. Post-Processing Finish Comparison: Durability, Tolerances, and Waterproofing
- 6. Frequently Asked Questions (FAQ)
- 7. References & External Sources
1. Chemical Solvent Dissolution Mechanics: How Vapor Smoothing Works
Chemical vapor smoothing relies on controlled solvent exposure to dissolve the outermost polymer chains of a thermoplastic part without destroying its underlying structural core. Solvents partially break inter-molecular van der Waals forces between polymer strands on the print surface, converting solid plastic into a localized liquid gel layer. Surface tension naturally forces this mobile gel layer to pull flat, filling microscopic layer valleys and rounding off sharp layer crests until the surface becomes smooth and glassy.
During the process, volatile organic solvent molecules penetrate the outer 50 to 150 microns of the FDM print. As the solvent evaporates into the surrounding air over several hours after removal from the vapor environment, the dissolved polymer chains re-crystallize and re-harden into a solid, non-porous thermoplastic shell. Unlike mechanical sanding, which physically removes material from peak layer ridges, chemical vapor smoothing redistributes material, preserving overall wall volume while eliminating seam lines.
💡 Maker's Workshop Note: The Viscosity Trap
In my early tests on ABS parts printed at 0.2mm layer height, I left a test cylinder inside an acetone vapor chamber for 45 minutes instead of the recommended 20 minutes. While the outer surface looked completely liquid and glassy when pulled from the chamber, the heavy, liquefied outer skin slid downward under gravity, pooling at the bottom and distorting fine 1mm mechanical overhangs. Always remember: vapor smoothing continues for 5 to 10 minutes *after* you remove the part from the chamber as residual solvent off-gasses.
2. Thermoplastic Solvent Compatibility Matrix: ABS, ASA, PLA, and PETG
Not all 3D printing filaments react identically to solvents. The chemical structure of the polymer dictates whether a solvent will cleanly smooth the surface, cause swelling and cracking, or have no effect whatsoever. Acrylonitrile Butadiene Styrene (ABS) and Acrylonitrile Styrene Acrylate (ASA) are ideal candidates for vapor smoothing due to their ketone solubility. Conversely, semi-crystalline polymers like PETG and standard PLA resist mild solvents and require specialized handling or mechanical finishing.
Below is a comparative breakdown of solvent compatibility, safety levels, and recommended smoothing methods for major FDM thermoplastics:
| Filament Type | Compatible Solvent | Smoothing Method | Safety Level | Resulting Surface Finish |
|---|---|---|---|---|
| ABS | Acetone (100% Pure) | Cold Vapor / Fan Chamber | Moderate Flammability / VOCs | High-Gloss, Injection-Molded Look |
| ASA | Acetone / MEK | Cold Vapor Chamber | Moderate Flammability / VOCs | High-Gloss, UV-Resistant Gloss |
| PLA / Modified PLA | Ethyl Acetate / Dichloromethane | Liquid Dip / Controlled Chamber | High Flammability / Toxic (DCM) | Semi-Gloss (Requires Caution) |
| PETG | Cyclohexanone / Dichloromethane | Not Recommended (Hazardous) | Extreme Health Hazard | Sanding & Filler Primer Preferred |
For detailed chemical properties and thermal behavior of these thermoplastics prior to post-processing, refer to our comprehensive FDM Materials Selection Guide.
3. Safe Cold Vapor and Hot Vapor Smoothing Protocols for ABS and ASA Prints
To safely smooth ABS and ASA prints without risk of fire or toxic exposure, cold vapor container setups are significantly safer than heated solvent boilers. Heated vapor setups vaporize acetone rapidly near open heating elements, creating explosive solvent vapor clouds that present severe flammability hazards in home workshops. A cold vapor chamber relies on natural evaporation, offering precise exposure control with minimal thermal risk.
Here is the step-by-step cold vapor smoothing protocol I use in my workshop:
- Step 1: Container Setup: Use a clear, sealable glass or polypropylene (PP, recycling symbol 5) container large enough to accommodate the 3D print with at least 50mm of clearance on all sides. Do not use polystyrene or acrylic containers, as acetone vapor will melt them.
- Step 2: Lining the Walls: Attach paper towels along the inner vertical walls of the container using magnetic clips or tape. Saturation of paper towels creates a large surface area for uniform solvent evaporation.
- Step 3: Elevating the Part: Place a glass dish or aluminum wire rack at the bottom of the container. Elevate the 3D printed model on a small ceramic block or aluminum foil pedestal so the base does not sit directly in liquid solvent pooling at the bottom.
- Step 4: Solvent Saturation: Using a glass dropper or squeeze bottle, saturate the paper towels with 30 to 50ml of 100% pure acetone. Avoid spilling liquid acetone directly onto the print or the bottom floor.
- Step 5: Sealed Chamber Timing: Seal the container lid tightly. Allow the cold vapor to circulate naturally for 15 to 30 minutes, inspecting the part through the clear glass every 5 minutes. Small models (under 50mm height) typically require 15 minutes, while larger parts take up to 30 minutes.
- Step 6: Controlled Off-Gassing: Remove the lid in a well-ventilated area (preferably outdoors or under a fume hood). Carefully lift the print out using forceps or by handling its unexposed bottom pedestal. Place the part under an inverted cardboard box for 2 to 4 hours to let residual solvent off-gas slowly without trapping dust particles on the tacky surface.
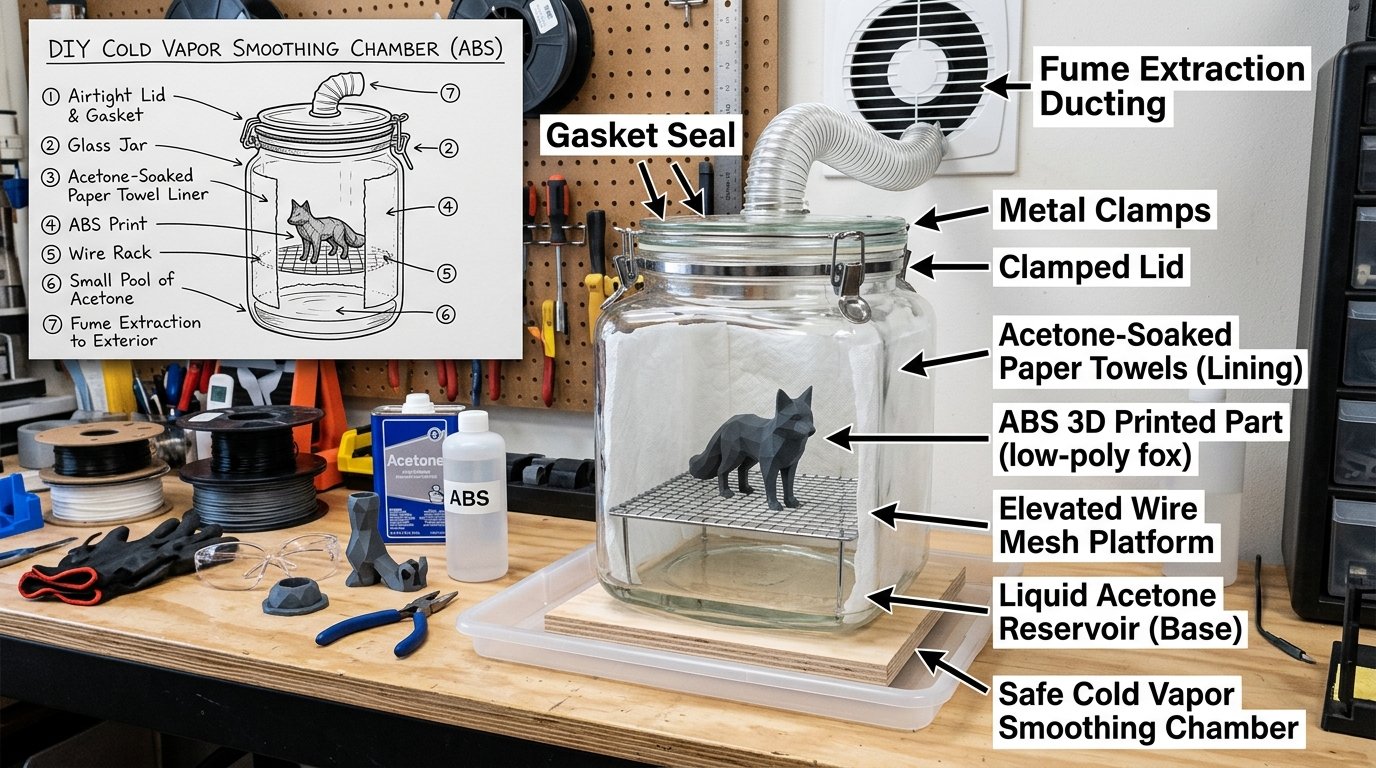
Figure 1: Schematic of a safe DIY cold vapor acetone chamber featuring saturated wall liners and an elevated component platform.
"Safety must remain the primary consideration during chemical vapor smoothing. Pure acetone boils at 56°C and generates flammable vapors heavier than air. Always operate in well-ventilated environments, eliminate spark sources, and avoid heat-assisted vapor boilers in residential workspaces."
4. Mechanical Post-Processing Routine for Un-smoothable Filaments (PLA/PETG)
Because standard PLA and PETG resist mild, consumer-safe solvents like acetone, attempting chemical smoothing with aggressive industrial solvents like Dichloromethane (DCM) introduces extreme health risks including liver toxicity and vapor inhalation hazards. For PLA, PETG, TPU, and carbon-fiber composites, a structured mechanical post-processing workflow utilizing high-build filler primers and progressive wet-sanding remains the safest and most reliable pathway to an injection-molded surface finish.
Dry sanding thermoplastics with low heat deflection temperatures (such as PLA, which softens at 55–60°C) creates localized friction heat that melts plastic dust into sticky rolls, gouging the surface and clogging sandpaper within seconds. Wet sanding solves this problem by lubricating the contact area, carrying away plastic debris, and maintaining cool surface temperatures.
The Step-by-Step Wet Sanding & Priming Routine:
- Initial Support Scar Removal (120–180 Grit): Begin by shaving down raised support nubs, z-seams, and heavy layer step artifacts using dry 150-grit silicon carbide sandpaper attached to a rigid sanding block. Sand gently in a circular motion until major protruding scars align with surrounding perimeters.
- First Spray Layer of High-Build Filler Primer: Wash the part with warm soapy water to remove all plastic dust, let it dry completely, and apply a light coat of high-build 2K acrylic aerosol filler primer from a distance of 20–25cm. High-build primer contains high solids content designed to bridge 0.1mm–0.2mm layer valleys.
- Coarse Wet Sanding Pass (240–320 Grit): Once the primer cures (typically 1 to 2 hours), submerge 320-grit wet-or-dry sandpaper in water mixed with a drop of dish soap. Wet sand the primered model using light pressure. You will notice dark primer remaining inside layer valleys while bare plastic emerges on high peaks—a clear visual signal that layer valleys are filling up.
- Secondary Prime & Fine Wet Sanding Pass (400–600 Grit): Apply a second light layer of filler primer to seal remaining micro-porosities. Allow it to cure, then wet-sand using 600-grit paper until the surface feels completely uniform and silky smooth under fingertips.
- Ultra-Fine Polishing & Paint Preparation (800–1000 Grit): Perform a final wet sanding pass with 1000-grit paper to remove 600-grit micro-scratches. Wipe the part down with isopropyl alcohol (IPA) before applying final automotive basecoat paints or clear UV-resistant polyurethane topcoats.
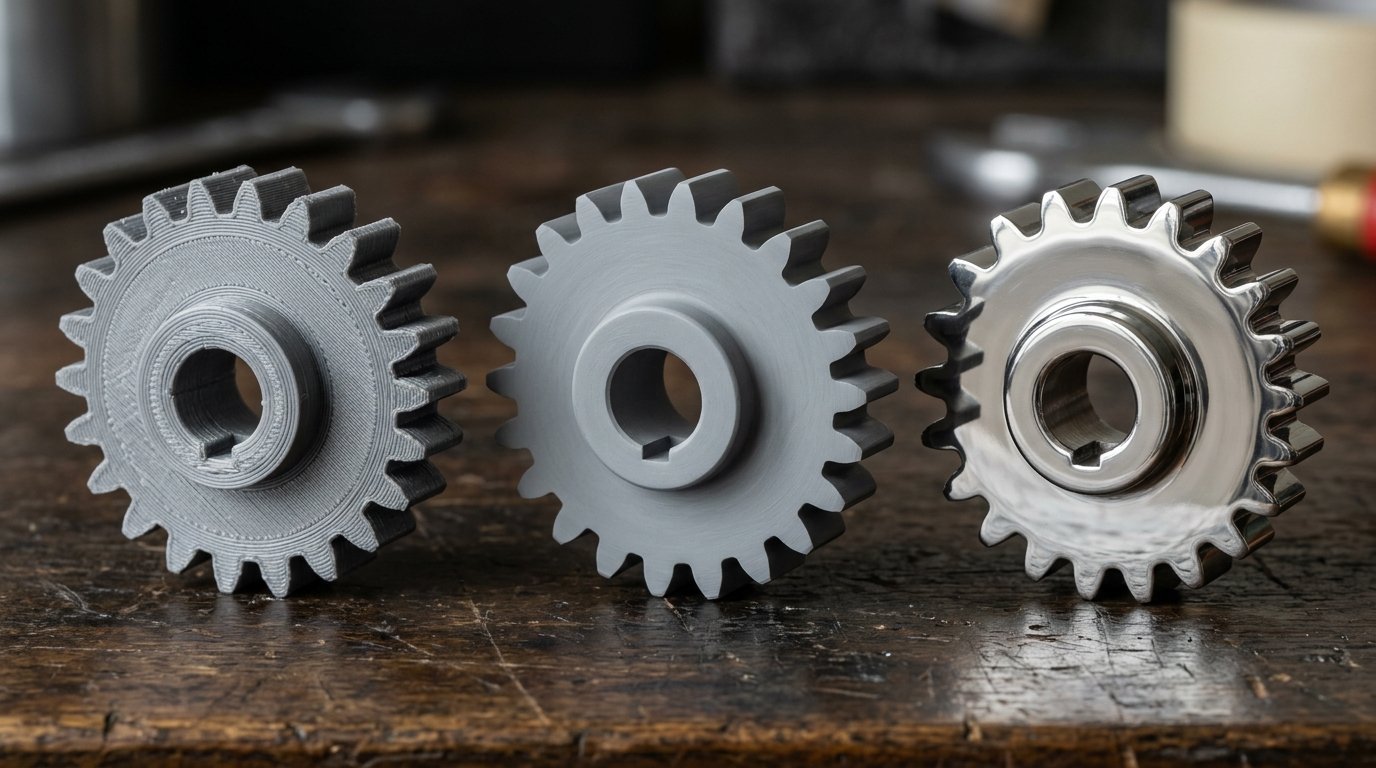
Figure 2: Macro comparison of FDM surface states: Raw extrusion (left), High-build filler primer with wet sanding (middle), and Glassy vapor smoothed ABS (right).
For more foundational techniques on support cleanup, hobby knife trimming, and safety equipment selection, see our dedicated Complete 3D Print Post-Processing Guide.
5. Post-Processing Finish Comparison: Durability, Tolerances, and Waterproofing
Selecting between chemical vapor smoothing and mechanical sanding involves balancing aesthetic gloss against mechanical performance, dimensional tolerances, and processing time. Chemical vapor smoothing excels at producing airtight, watertight seals on functional FDM containers, but can degrade sharp mechanical edges and tight thread tolerances if over-exposed.
Mechanical sanding combined with filler priming offers superior dimensional control on precision press-fit parts, but requires significantly higher labor hours and creates a multi-layered surface structure that can chip under heavy impacts.
Key Performance Differences:
- Watertightness & Sealed Interiors: Chemical vapor smoothing welds adjacent layer lines together, eliminating micro-gaps between extruded beads. This makes vapor-smoothed ABS and ASA containers 100% liquid-tight. In contrast, primed prints remain porous internally unless internal walls receive sealant coats.
- Dimensional Accuracy: Wet sanding with a sanding block allows precise material removal on flat mechanical faces. Vapor smoothing shrinks sharp external corners by 0.05mm–0.15mm due to surface tension collapse during polymer liquefaction.
- Layer Adhesion Impact: Chemical smoothing slightly enhances interlaminar bond strength along outer perimeters by fusing layer interface boundaries, whereas sanding has zero effect on internal layer adhesion.
6. Frequently Asked Questions (FAQ)
Can you vapor smooth PLA using acetone?
No. Pure acetone does not dissolve or smooth standard PLA. Acetone may slightly discolor or embrittle PLA by leeching out additives, but it will not melt layer lines flat. PLA requires specialized solvents like Ethyl Acetate or THF, or mechanical wet sanding with filler primer.
How long does a 3D print take to fully dry and harden after acetone vapor smoothing?
While the print can be handled carefully after 30 to 60 minutes of off-gassing, full polymer re-crystallization takes 12 to 24 hours depending on part wall thickness. Keep the part in a dust-free, well-ventilated space until all acetone odor dissipates.
Does vapor smoothing weaken FDM 3D prints?
Vapor smoothing does not weaken tensile strength if performed correctly. In fact, by eliminating sharp layer notches (which act as stress concentration points), vapor smoothing can increase impact toughness. However, over-exposure that melts internal infill structures will cause structural collapse.
What safety equipment should I wear when wet sanding and spraying primer?
Always wear an N95 or P2 particulate respirator during sanding to prevent inhaling fine plastic particles. When spraying aerosol filler primers or paints, use an organic vapor respirator mask (3M half-face with A1/P2 cartridges) in a well-ventilated outdoor setting.
7. References & External Sources
- Prusa Knowledge Base: Acetone Smoothing of ABS Prints — Official technical guidelines on cold acetone vapor smoothing protocols and material safety.
- Bambu Lab Wiki: Post-Processing & Surface Finish Guide — Documentation on post-processing techniques, filament selection, and layer line removal.
- ISO/ASTM 52900: Additive Manufacturing Terminology & Principles — International standardization reference for polymer post-processing and surface texture parameters.
About the Author: Dinu Suciu
Dinu Suciu is a hands-on 3D printing maker and lead editor at 3D Print Book. Operating an active workshop with high-speed CoreXY FDM printers, Dinu specializes in FDM mechanical calibration, polymer material science, slicer tuning, and post-processing routines. Have questions about surface finishing your prints? Get in touch via our contact page.