One of the most persistent bottlenecks in Fused Deposition Modeling (FDM) 3D printing is the anisotropic nature of the finished parts. While injection-molded plastic parts exhibit isotropic strength—meaning they resist mechanical stress equally in all directions—FDM components suffer from a distinct structural vulnerability along the vertical Z-axis. Because the part is built line by line, layer by layer, its ultimate tensile strength is heavily limited by how well each new track of molten plastic fuses to the already solidified layer beneath it. If interlayer fusion is weak, the part will delaminate and crack apart under minimal mechanical loads, rendering functional prototypes and end-use components practically useless.
As the owner and lead technician of 3D Print Book, I operate a dedicated local print farm focusing exclusively on FDM technologies. Over years of printing load-bearing brackets, structural enclosures, and customized mechanical linkages, I have analyzed the physical, thermal, and chemical mechanisms that dictate interlayer adhesion. In this technical guide, I will share the exact slicing adjustments, environmental controls, and material preparation techniques required to eliminate layer separation and maximize the structural integrity of your functional prints.
1. Why Do FDM 3D Prints Delaminate?
Layer delamination in FDM 3D printing occurs when adjacent thermoplastic layers fail to merge into a single cohesive structure during the extrusion process. This weak bond is typically caused by insufficient thermal energy at the print interface, preventing polymer chains from diffusing across the boundary before the extruded plastic cools down.
To understand why this happens, we must look at the thermodynamic behavior of semi-crystalline and amorphous polymers. The bonding process between two 3D printed layers is governed by molecular diffusion. When a strand of molten plastic is extruded from the nozzle, it carries a specific budget of thermal energy. To form a solid structural bond with the layer below (which has already cooled and solidified), the heat from the newly extruded track must perform two critical tasks almost instantaneously: it must re-melt a very thin outer boundary of the cold lower layer, and it must keep both layers in a semi-liquid state long enough for the macromolecular polymer chains to wiggle across the boundary and become entangled. This molecular interpenetration across the interface is known as polymer chain diffusion or "entanglement," and its physical behavior is described mathematically by the reptation theory of polymer dynamics.
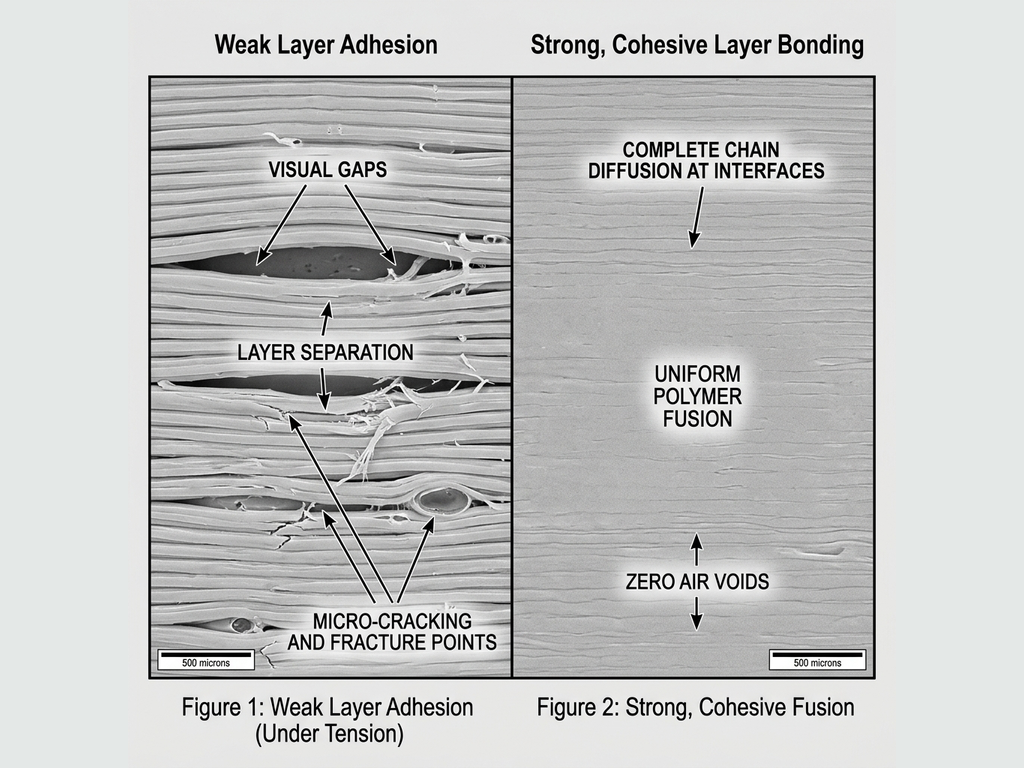
If the lower layer has cooled down significantly below its glass transition temperature ($T_g$) or if the ambient air surrounding the printer is cold and turbulent, the heat from the newly extruded plastic is sucked away too quickly. The interface temperatures drop below $T_g$ in a fraction of a second, freezing the polymer chains in place before they can diffuse across the boundary. What you end up with is a purely mechanical, superficial contact area (adhesive contact) rather than a unified, cohesive molecular matrix. The layers remain distinct, separated sheets that slide past each other easily when put under tensile or bending stress.
Furthermore, this mechanical weakness is severely compounded by thermal contraction. As thermoplastics cool from their extrusion temperature down to room temperature, they shrink in volume. When a hot, expanded layer is laid down on top of a cold, pre-shrunk layer, the new layer contracts as it cools. This differential contraction generates massive internal shear stresses (residual thermal stresses) at the layer boundary. These stresses act as miniature internal wedges, actively pulling the layers apart. If these thermal forces exceed the weak interlayer bond strength, the print will warp, lift from the bed, or split open mid-print with audible cracking noises. To prevent this, understanding the thermal behavior of plastics is essential, which is why reviewing our comprehensive materials guide is highly recommended to understand how different polymers warp under thermal stress.
2. Key Settings to Improve Layer Adhesion
Optimizing slicer settings is the most effective way to eliminate layer delamination and build highly resilient mechanical components. Fine-tuning extrusion temperatures, slowing print speeds, limiting active cooling fan use, and slightly increasing flow multipliers directly increases thermal transfer and contact pressure at the fusion interface.
Let us break down the exact parameters you should adjust in your slicer (such as Cura, PrusaSlicer, or Bambu Studio) to maximize Z-axis strength:
A. Elevate the Extrusion (Nozzle) Temperature
Thermal energy is the single most important factor driving polymer diffusion. If you are printing at the lowest end of a filament’s recommended temperature range (for example, printing PLA at 190°C), you will get clean, string-free prints, but very poor layer adhesion. To maximize strength, increase your nozzle temperature by 5°C to 15°C above your standard settings. For instance, raising PLA to 215°C–220°C or PETG to 245°C–250°C decreases the viscosity of the molten plastic, allowing it to flow more readily into the microscopic crevices of the previous layer and keeping the interface above $T_g$ for a significantly longer duration.
B. Restrict Active Cooling Fan Speed
While the active cooling fan is crucial for achieving crisp overhangs, sharp corners, and bridging gaps without sagging, it is the enemy of layer strength. A fan blowing at 100% speed instantly cools the extruded plastic, stopping the molecular diffusion process dead in its tracks. For functional parts, reduce your active cooling fan speed to 20% to 50% for PLA, and 10% to 30% for PETG. For high-temperature materials like ABS or ASA, the fan should be turned off completely (0%), except for short layers or bridge sections. This slower cooling rate preserves the heat within the part, allowing the polymer chains ample time to entangle.
C. Reduce Print Speed (Particularly for Outer Walls)
Printing at high speeds (over 100 mm/s on standard desktop machines) means the hot nozzle passes over the lower layer very quickly. This brief contact limits the amount of heat conducted from the heater block and nozzle tip into the cold layer below. By slowing down print speeds to 30–50 mm/s for functional walls, the hot brass or hardened steel nozzle remains in physical contact with the extrusion zone for longer. This prolonged physical contact acts as an iron, pre-heating the solid plastic beneath it just milliseconds before the new molten material is deposited, which dramatically increases interface temperature and subsequent bonding.
D. Optimize the Layer Height to Nozzle Diameter Ratio
The geometry of the extruded bead plays a vital role in mechanical adhesion. If you slice a print with a layer height that is too tall relative to your nozzle diameter (e.g., a 0.32mm layer height on a 0.4mm nozzle), the extruded bead is shaped like a round cylinder rather than a flattened oval. This round shape minimizes the flat contact area between the layers and leaves massive triangular air gaps at the outer boundaries. To ensure excellent compaction and a wide bonding surface, keep your layer height below 50% of your nozzle diameter (e.g., maximum 0.2mm height for a 0.4mm nozzle, or 0.3mm height for a 0.6mm nozzle). The physical squish of the plastic under the nozzle flat surface ensures maximum contact area and mechanical pressure.
E. Slightly Increase the Extrusion Multiplier (Flow Rate)
Under-extrusion is a silent killer of part strength, as it leaves tiny microscopic voids between adjacent toolpaths. By slightly increasing your extrusion multiplier in your slicer to 102%–104% (or 1.02–1.04), you force a tiny amount of extra plastic into the print. This extra material increases the internal pressure within the melt zone, squeezing out air bubbles and forcing the hot polymer chains into tighter physical contact with the layer below. For mechanical troubleshooting regarding physical extruder issues, you can reference our detailed troubleshooting guide to verify that your hardware is not slipping or clogging.
"When printing functional parts, you must shift your mindset from cosmetics to physics. A slightly glossy, hotter print with minor stringing will almost always be twice as strong as a matte, cool print that looks visually flawless but shatters along the layers at the first sign of load." — Dinu Suciu, Owner of 3D Print Book
Slicer Setting Adjustments for Maximum Layer Strength
To help you implement these changes quickly in your slicing software, refer to this comparative settings matrix tailored for the most common FDM materials:
| Filament Type | Standard Temp (Cosmetics) | Recommended Strength Temp | Fan Speed (Cosmetics) | Fan Speed (Strength) | Wall Print Speed | Flow Multiplier |
|---|---|---|---|---|---|---|
| PLA | 195°C – 205°C | 215°C – 225°C | 100% | 20% – 40% | 35 – 45 mm/s | 102% (1.02) |
| PETG | 230°C – 235°C | 245°C – 255°C | 40% – 50% | 10% – 20% | 30 – 40 mm/s | 103% (1.03) |
| ABS / ASA | 240°C – 245°C | 255°C – 265°C | 15% – 20% | 0% – 10% (Chamber) | 40 – 50 mm/s | 102% (1.02) |
| TPU (Flexible) | 210°C – 220°C | 230°C – 235°C | 60% | 20% – 30% | 20 – 25 mm/s | 104% (1.04) |
3. Filament Choice and Storage Considerations
The molecular structure of your selected 3D printing filament and its storage conditions dictate its susceptibility to layer delamination. Amorphous polymers like ABS and ASA warp and split easily without a heated print chamber, while moisture absorbed by wet filaments creates steam pockets during extrusion that catastrophically weaken interlayer bonds.
Even if your slicer settings are perfectly calibrated, you can still experience catastrophic layer splits if you choose the wrong material for the job or fail to manage your filament moisture levels. Let us examine how material properties and environmental storage affect Z-axis adhesion:
Material Chemistry: Amorphous vs. Semi-Crystalline
Amorphous plastics (like ABS, ASA, and Polycarbonate) have a disordered molecular structure. They do not have a sharp melting point; instead, they soften gradually as temperature increases. However, they are highly sensitive to thermal gradients. When printed in an open-frame 3D printer, the cold ambient air causes the plastic to contract rapidly. Because of this high shrinkage rate, ABS and ASA parts will warp and delaminate along the layer lines very easily. To print these materials successfully with strong layers, you must use an enclosed chamber (either passively heated by the print bed or actively heated). The enclosure maintains the ambient temperature at 40°C to 65°C, preventing the rapid cooling and volume contraction that tears the layers apart.
In contrast, semi-crystalline plastics (like PLA and PETG) have highly ordered molecular regions. They have a lower thermal contraction rate and are much less prone to warping. However, PETG is highly prone to stringing, and many users overcompensate by increasing the fan speed and lowering print temperatures. This is a critical mistake, as PETG requires high heat and low fan speeds to achieve its legendary impact strength and chemical-resistant interlayer bonds.

The Catastrophic Impact of Wet Filament (Hydrolysis and Steam)
Almost all FDM filaments are hygroscopic, meaning they actively absorb moisture from the surrounding air. Nylon, TPU, PETG, and ABS are extremely hygroscopic, and even PLA will absorb moisture over several weeks in humid environments. When wet filament is pulled into a 3D printer nozzle heated to 200°C–260°C, the water trapped inside the polymer matrix is instantly heated past its boiling point. It flashes into high-pressure steam, creating tiny explosions inside the melt zone of the nozzle.
This boiling steam disrupts the print in two devastating ways:
- Mechanical Voiding: As the steam escapes the nozzle tip, it leaves microscopic bubbles, pockets of air, and physical gaps within the laid-down plastic track. These voids drastically reduce the surface contact area between the layers, leaving a porous, foam-like structure that splits apart under the slightest stress.
- Chemical Degradation (Hydrolysis): At high temperatures, the presence of water molecules breaks the long polymer chains of materials like PETG, Nylon, and PLA into shorter, weaker molecules. This molecular fragmentation permanently degrades the tensile strength of the polymer itself, making the final part highly brittle.
To prevent moisture-related layer failures, dry your filament using a dedicated filament drying oven before printing. PLA should be dried at 45°C–50°C for 4 hours, PETG at 60°C–65°C for 6 hours, and ABS at 70°C–80°C for 6+ hours. Always store your spools in airtight dry boxes with fresh silica gel packets to prevent them from re-absorbing moisture during long print jobs.
4. Practical Checklist to Eliminate Layer Delamination
Before launching a critical mechanical print, run through this practical pre-flight checklist to ensure your parts do not fail along the Z-axis:
- Check Print Orientation: Orient the part in your slicer so that the primary mechanical forces pull parallel to the layer lines (shear stress), rather than perpendicular to them (tensile stress). Never place a layer line interface under direct, pure tensile loads if it can be avoided by rotating the model 90 degrees.
- Dry Your Filament: If your filament has been sitting out in the room for more than a few days, dry it. Do not assume a new spool fresh out of the vacuum-sealed manufacturer bag is dry—manufacturers frequently cool their extruded filaments in water baths before spooling.
- Increase Wall Line Count (Perimeters): Instead of increasing infill percentage (which does very little for structural bending strength), increase your wall line count to 4, 5, or 6 perimeters. Walls are continuous loops of extruded plastic that carry the majority of mechanical stress; thicker walls provide a massive boost to overall structural rigidity and layer contact area.
- Enclose the Printer: If you are printing ABS, ASA, or Nylon, use a draft shield or a solid enclosure. Even a cardboard box placed over an open printer will trap the heat from the print bed and prevent cold drafts from causing Z-axis splits.
- Calibrate Your Extruder E-Steps: Ensure your printer is actually extruding the exact amount of plastic your slicer expects. A calibrated extruder ensures proper bead compression and eliminates hidden gaps.
5. Frequently Asked Questions (FAQ)
Q1: How do I know if my print failed due to poor layer adhesion or under-extrusion?
Under-extrusion leaves visible gaps, holes, or thin walls throughout the print surface due to a lack of plastic flow. In contrast, poor layer adhesion features perfectly extruded, smooth walls that split easily between layers under minimal mechanical stress, showing clean separation lines.
Q2: Does layer height affect layer adhesion positively or negatively?
Lower layer heights generally improve layer adhesion. A thinner layer allows the hot nozzle to compress the plastic more firmly against the layer below, increasing the contact surface area and transferring more thermal energy to promote polymer chain diffusion.
Q3: Can I use post-print annealing to improve layer adhesion?
Yes, annealing—heating the printed part in a controlled oven below its melting point—realigns the polymer molecules and fuses the layers further, significantly increasing Z-axis strength. However, it often causes dimensional shrinkage or warping in amorphous plastics like PLA.
Q4: Is PLA inherently bad for functional load-bearing parts due to layer adhesion?
PLA has excellent layer adhesion when printed at the correct temperature, but it is brittle and has low heat resistance. For high-stress applications, PETG or ABS are preferred because they offer better impact resistance, tensile strength, and flexural endurance under load.
Q5: Why is PETG often praised for its layer adhesion, and how do I maximize it?
PETG is a modified polyester with exceptional chemical and thermal bonds, meaning its layers naturally fuse very well. To maximize PETG layer adhesion, print it hot (around 240-250°C), keep the active cooling fan low (20-30%), and avoid printing too fast so the polymer chains have enough time to interface.
About the Author: Dinu Suciu
I am Dinu Suciu, the lead technician and owner of 3D Print Book. Operating an FDM-focused 3D printing workshop, I have spent years optimizing slicer parameters and testing the physical limits of engineering filaments. My passion lies in helping designers, engineers, and makers convert digital CAD designs into robust, functional physical prototypes that perform reliably under real-world stress. If you need assistance troubleshooting a structural component or selecting the right material properties, feel free to contact me directly via our dedicated contact page.