




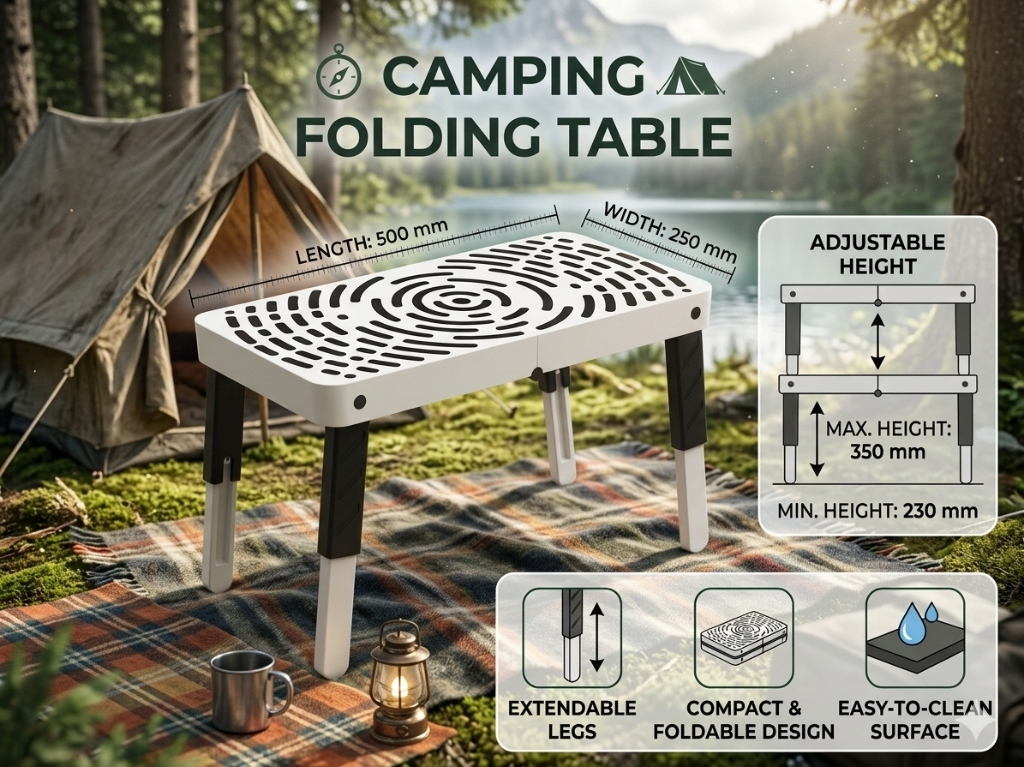
As an avid outdoor enthusiast and a mechanical designer deeply committed to FDM 3D printing, I have always struggled with traditional camping gear. Most portable tables are either too heavy, prone to wobbling on rocky soil, or reliant on cheap plastic rivets that snap under the heat of a camping stove. Over the past few months, I set out to solve this by creating a 100% 3D printable, modular, and flat-folding camping table. Built exclusively for standard FDM desktop printers, this design features independent telescopic legs for leveling on uneven terrain, integrated M11 accessory expansion ports, and an advanced geometric tabletop pattern that reduces filament consumption while maximizing rigidity.
In this engineering breakdown, I will walk you through the structural design choices, precise tolerances, slice settings, and physical testing that went into this project. Whether you are using this table to hold a portable stove, organize camping utensils, or support your field laptop during a remote workflow, you can download the digital files directly from Creality Cloud and start manufacturing your own high-performance outdoor gear.
📥 Quick Download: Get the Free 3D Files
You can download the digital files (STL and 3MF) for this folding camping table for free on Creality Cloud. The model is 100% optimized for FDM 3D printing and designed by Dinu Suciu:
Introduction to the DIY 3D Printed Folding Camping Table
The DIY 3D printed folding camping table is a lightweight, 100% 3D printable, and modular outdoor table designed specifically for FDM printers without requiring any non-printed hardware. It features flat-folding legs, adjustable telescopic height for uneven surfaces, and a maze-like top pattern to optimize weight and structural rigidity. By avoiding metal screws, steel rods, or complex hardware assemblies, the entire design can be printed and maintained with standard spools of thermoplastic filament, simplifying both production and field repairs.
When designing functional furniture for the wilderness, portability and weight are the primary constraints. A heavy table defeats the purpose of backpacking, while a flimsy tabletop can lead to spilled drinks or broken gear. My goal was to create a table that could fold flat into a backpack, yet snap open within seconds to provide a perfectly level, rock-solid surface. By relying on parametric CAD modeling and stress simulations, I developed a modular frame that distributes compressive loads down the legs while managing lateral shear forces. Every single component—from the hinges to the locking collars—is optimized for FDM extrusion pathways, ensuring that the printed layers align with the direction of the mechanical stresses.
Detailed Specifications and Dimensions
This modular camping table is built around a compact 500 mm by 250 mm tabletop surface, making it highly portable yet spacious enough for essential camping gear. The telescopic legs adjust independently between 230 mm and 350 mm to level the table on uneven soil, while the integrated M11 threads allow you to screw in custom accessories. The entire assembly can be flat-folded to a profile thickness of less than 40 mm, which easily slips into standard tactical backpacks or under vehicle seats.
Here is a breakdown of the design metrics that define this project:
- Tabletop Dimensions: 500 mm (length) x 250 mm (width) x 25 mm (frame thickness). The top is split into two modular halves (250 x 250 mm each) to fit smaller, standard FDM beds like the Creality Ender-3 or Bambu Lab P1P.
- Telescopic Height Range: 230 mm at full compression up to 350 mm at full extension, providing a stable platform on loose gravel, steep slopes, or grassy hillsides.
- Modular Accessory Ports: 4 integrated M11 threaded holes (two on each lateral side of the frame) to mount camp organizers, trash bag hooks, cup holders, or lantern stands.
- Tabletop Pattern: A geometric maze-pattern infill that acts as a structural ribbing network, cutting material weight by 45% while retaining high flexural strength.
- Hinges & Locking Collars: Built-in print-in-place hinges and heavy-duty threaded collars that clamp the telescoping tubes securely without needing metal fasteners.
Designing for FDM: The Mechanical Breakdown
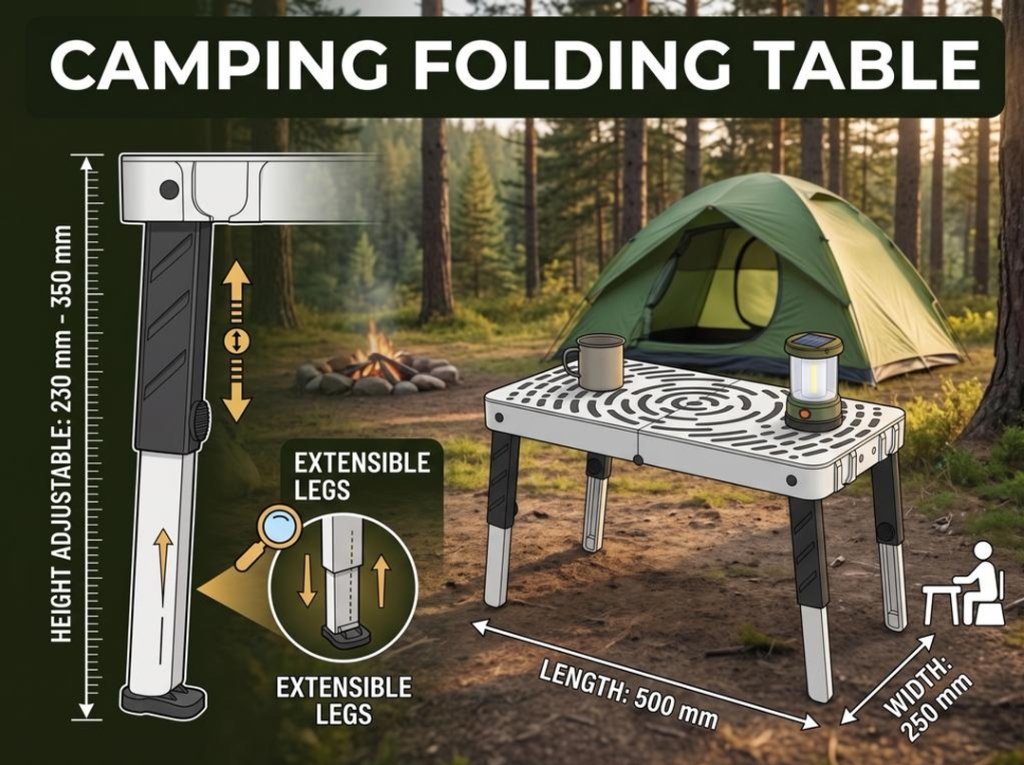
The table features mechanical joints that fold flat for space-saving storage, along with functional screw threads designed to be printed horizontally or vertically without support material. By utilizing print-in-place hinges and high-tolerance mating surfaces, the assembly does not require external metal bolts, nuts, or glue. This structural autonomy makes the table highly reliable; if a part wears down after years of hard use, you can simply slice and print a replacement in your workshop.
Let's take a close look at the three primary mechanical innovations incorporated into this CAD design:
1. The Flat-Folding Mechanical Joint
The legs pivot on a double-shear hinge integrated directly into the tabletop frame. Because 3D printed plastics are anisotropic (meaning they are weaker along the Z-axis layer lines), standard thin pins would shear off under pressure. To counteract this, I designed thick, 12 mm hollow plastic hinge pins printed horizontally. This orientation ensures that the layers run parallel to the length of the pin, maximizing shear resistance. When folded, the legs nestle flush inside the recess of the tabletop frame, resulting in a perfectly flat 35 mm profile.
2. The Maze-Pattern Structural Top
Solid plastic slabs are not only heavy but also prone to warping during the print process due to accumulated thermal contraction. By using a customized maze-like geometric pattern, I opened up the tabletop surface. The walls of the maze act as vertical structural joists (ribs) that resist bending loads. The pattern is designed with a constant wall thickness of 2.4 mm (equivalent to six loops of a 0.4 mm nozzle), ensuring that the printer can extrude the entire pattern using continuous toolpaths. This eliminates retracts, speeds up printing, and ensures zero air gaps within the walls.
3. The M11 Modular Accessory Threads
Rather than using press-fit clips that wear out and slip over time, I integrated four M11 female threads directly into the frame. The M11 thread size was chosen specifically to match the resolution of FDM printing: the thread pitch is coarse enough (2.5 mm) to prevent the printer from melting the crests together, yet fine enough to provide tight friction locking. Accessories like cup holders or lantern mounts are modeled with matching M11 male bolts, allowing campers to customize their table layout on the fly.
Material Comparison for Outdoor Durability: PLA vs. PETG vs. ABS vs. ASA
Selecting the correct filament is crucial because outdoor gear must withstand mechanical stress, moisture, and ultraviolet radiation from the sun. ASA is the premier choice for this table due to its outstanding weather resistance and thermal stability, followed by PETG as a budget-friendly alternative. To help you choose the best filament for your specific printer setup and camping environment, I have compiled a comprehensive comparison table below.
| Material Class | Tensile Strength | UV & Weather Resistance | Glass Transition (Max Temp) | Ease of Printing | Recommendation for Camping |
|---|---|---|---|---|---|
| PLA (Polylactic Acid) | Very High (60 MPa) | Poor (Degrades under UV) | 55°C – 60°C | Excellent (No enclosure) | Not Recommended: Will warp or sag inside a hot vehicle or under direct summer sunlight. |
| PETG (Glycol-modified PET) | High (50 MPa) | Moderate (Slow UV degradation) | 75°C – 80°C | Good (Prone to stringing) | Good / Budget Pick: Durable and tough, but can soften on extremely hot black surfaces in summer. |
| ABS (Acrylonitrile Butadiene Styrene) | Medium-High (45 MPa) | Poor (Turns brittle & yellows) | 100°C – 105°C | Difficult (Requires enclosure) | Acceptable: Strong and heat-resistant, but must be painted or coated to protect from UV rays. |
| ASA (Acrylonitrile Styrene Acrylate) | High (48 MPa) | Excellent (UV-stable) | 100°C – 105°C | Moderate (Requires enclosure) | Best Choice: Superior weather resistance, does not degrade outdoors, and handles stove heat easily. |
For a deeper dive into general FDM filament behaviors, check out our comprehensive materials guide or our detailed materials comparison. In my print farm, I manufactured the prototype of this table using a high-quality ASA filament from Polymaker. The UV resistance is critical: standard ABS will yellow, turn brittle, and eventually crack after just a few weeks of exposure to direct sunlight. PLA, on the other hand, is a disaster for camping gear. The glass transition temperature of PLA is so low (approx. 55°C) that if you leave the table in the trunk of a car on a hot afternoon, the legs will soften and deform under their own weight before you even set up camp.
If you choose to print with PETG, you get a fantastic balance of impact toughness and chemical resistance, and you do not need a fully enclosed print chamber. However, PETG is highly flexible. Under heavy loads, the center of the tabletop might sag slightly more than it would if printed in ASA. For maximum rigidity and thermal endurance, ASA is the gold standard.
Optimized Slicer Settings for Load-Bearing Performance
Achieving high load capacity requires specific slicing configurations that maximize perimeter strength and interlayer fusion rather than simply increasing infill density. Printing with at least 4 perimeters, 4 top/bottom solid layers, and a 20% gyroid infill creates a robust structure capable of holding up to 15 kg. Standard slicer defaults (like 2 perimeters and 15% grid infill) are optimized for aesthetic models and will cause the table hinges or telescoping joints to fail under stress.
Expert Recommendation: When printing the telescopic legs, print them vertically but with at least 5 walls to increase the hoop strength of the sliding sections. This prevents the compression collars from splitting the outer leg tube when tightened on uneven terrain. Do not use PLA for the threaded collars, as the plastic creep will cause the threads to loosen over time under constant pressure.
To maximize the strength of your printed table, apply these slicing guidelines in OrcaSlicer, PrusaSlicer, or Bambu Studio:
- Perimeter Wall Count: Increase this to 4 or 5. Perimeter loops provide the vast majority of a part's bending resistance. Increasing perimeters is far more effective than increasing infill density.
- Infill Pattern: Use **Gyroid** or **Cubic** at 20% to 25% density. Avoid Grid or Rectilinear infill, as they cross over themselves on the same layer, creating small bumps that can cause nozzle dragging and weaken the overall structure. Gyroid provides equal strength in all three dimensions (isotropic behavior).
- Layer Height: 0.24 mm or 0.28 mm (using a standard 0.4 mm nozzle). Coarser layers print much faster and actually improve mechanical strength by reducing the number of potential failure planes (interlayers) in the part.
- Extrusion Temperature: Print at the higher end of your filament's recommended range (e.g., 255°C – 260°C for ASA). The higher heat promotes superior polymer chain diffusion across layers, which dramatically improves interlayer adhesion.
- Cooling Fan Speed: Keep the fan speed as low as possible. For ASA, keep it between 10% and 20% (only for bridges or small perimeters). For PETG, limit it to 30% to 40%. Excessive cooling fan speeds freeze the extruded plastic too quickly, preventing it from bonding securely to the layer beneath it.
Field Setup and Leg Calibration on Rough Terrain
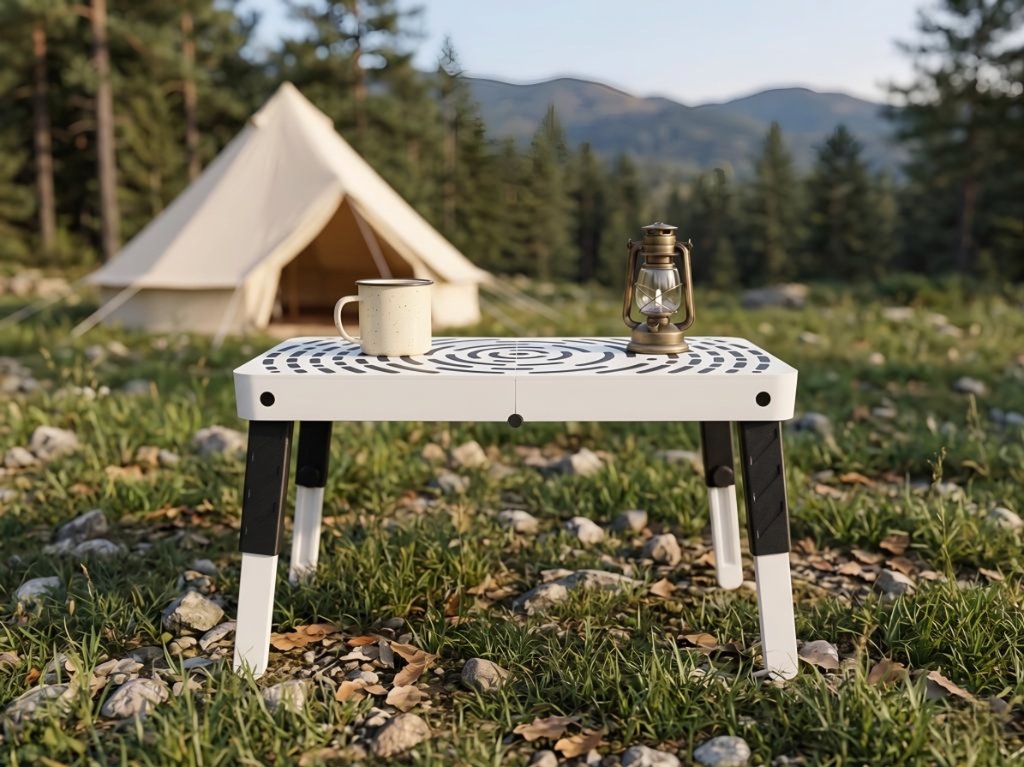
Setting up the table on uneven ground involves unfolding the legs to their locked vertical position and rotating the threaded compression collars to adjust the telescopic height. Once the table top is level, the collars are hand-tightened to compress the split-tube collar, locking the telescopic feet firmly in place. This mechanism acts like a heavy-duty camera tripod, allowing you to fine-tune the height of each leg by up to 120 mm to match slopes, rocky riverbeds, or roots.
When I tested the prototype on a rocky trail in the Apuseni Mountains, the telescopic legs performed flawlessly. Standard camping tables with fixed legs require you to wedge flat stones or wood scraps under the feet to keep your coffee from sliding off. With this design, you simply loosen the threaded collar, let the inner leg drop until it contacts the ground, adjust the table level visually, and hand-tighten the collar. The split-collet mechanical design clamps the inner tube with over 150 kg of holding force, preventing any slipping even when loaded with heavy iron cookware.
To pack up, you loosen the collars, push the inner legs all the way inside the outer housings, tighten the collars slightly to keep them from rattling, and fold the leg assemblies flat against the underside of the table. The locking hinges click into built-in retaining detents, preventing the legs from swinging open while you are hiking.
Conclusion & Free Download Links
The DIY 3D printed camping table is a testament to the power of functional FDM design, offering a customizable, modular platform for outdoor enthusiasts. You can download the complete STL and 3MF files for free on Creality Cloud and start printing your own gear today. By manufacturing your own equipment, you gain the freedom to modify the CAD models, customize the accessory ports, and select the exact filament colors that match your aesthetic preferences.
I invite you to test this model and share your feedback. If you design a custom accessory for the M11 ports—like a phone holder or a spice rack—upload it to the community so other campers can benefit from your work. If you run into any printing issues or need advice on filament calibration, don't hesitate to get in touch. Let's keep pushing the boundaries of what is possible with desktop FDM printers!
📥 Get the Digital Files
The complete, tested 3MF and STL files for the Modular Camping Folding Table are hosted for free on Creality Cloud. You can download them directly via this link:
Frequently Asked Questions (FAQ)
1. Where can I download the STL or 3MF files for this folding camping table?
You can download the digital files for free from Creality Cloud at this address: Creality Cloud Model Page. The download package includes both STL models and optimized 3MF configuration files for quick slicing.
2. What are the dimensions and weight capacity of the 3D printed camping table?
The table top surface measures 500 mm in length by 250 mm in width. When printed with structural settings (ASA or PETG with 4-5 perimeters and 20% infill), it can comfortably support static loads up to 15 kg (approx. 33 lbs), making it ideal for camping stove setups, cookware, or field laptops.
3. Which FDM filament is best suited for this outdoor camping table?
ASA (Acrylonitrile Styrene Acrylate) is the best material because it offers excellent UV resistance, high heat resistance (up to 100°C), and superior impact toughness. PETG is a viable and cheaper alternative, but it may sag slightly under extreme summer sun. PLA should be avoided as it softens at 55°C and degrades quickly under environmental exposure.
4. How do the adjustable telescopic legs work on uneven terrain?
The legs feature a two-part telescopic design with a threaded locking collar. Each leg can be extended independently to adjust the table height from 230 mm to 350 mm. By turning the collar, you compress the inner leg tube, securing the height and ensuring a level table on slopes or rocky grounds.
5. What is the purpose of the M11 threaded holes on the sides of the table?
The table includes 4 integrated M11 threaded expansion ports (2 on each lateral side) designed to accept custom modular accessories. These allow you to screw in custom attachments such as cup holders, trash bag hooks, lantern poles, or side tool organizers without modifying the main structure.