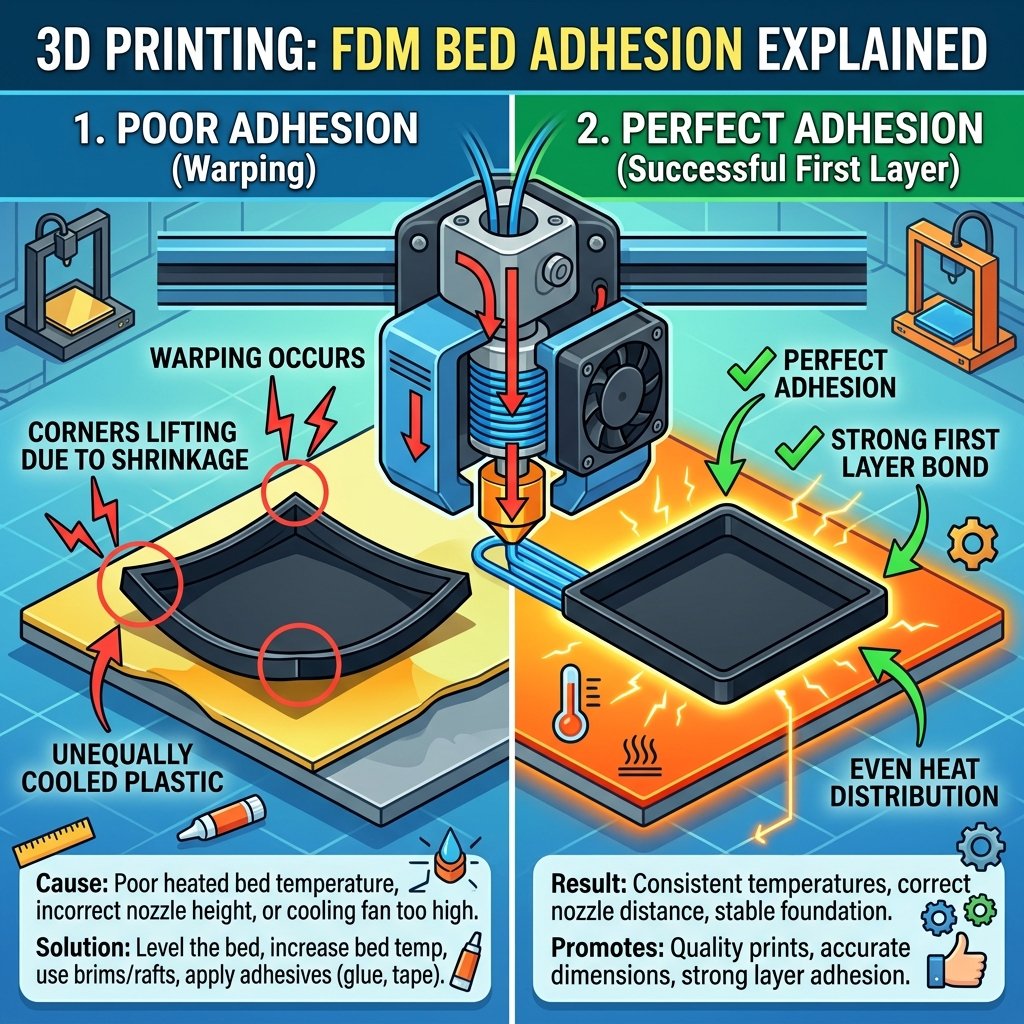
Few things are more frustrating in Fused Deposition Modeling (FDM) 3D printing than coming back to a long print only to find its corners lifted, curled, or the entire part detached and dragged around by the nozzle. This defect, widely known as warping, is a common issue that plagues both beginners and experienced makers. When the first layer fails to stay securely anchored to the build plate, the dimensional accuracy of the part is ruined, structural integrity is compromised, and print jobs fail catastrophically.
As the owner of 3D Print Book, running a dedicated local print farm filled with FDM machines, I have faced and solved this issue thousands of times across various materials and geometries. Achieving perfect bed adhesion is not about luck; it is a science that combines thermal management, chemical surface prep, and physical geometry calibration. In this comprehensive guide, I will walk you through why prints peel, analyze the top methods to secure your prints, and give you the exact guidelines to completely stop warping on your FDM prints.
1. Why does my FDM 3D print peel off the bed?
Prints warp and peel off the bed when plastic cools and shrinks, generating lateral and upward thermal stresses that pull the corners of the model away from the build plate. Proper bed leveling, heated bed calibration, and correct ambient temperature management are required to neutralize these forces and keep the print anchored.
To understand how to prevent warping, we must look at the physics of thermoplastic behavior. When your printer extrudes filament, it melts the plastic at temperatures ranging from 190°C to 260°C or higher. In this liquid state, the polymer chains are relaxed and expanded. As the plastic is deposited onto the build surface, it immediately begins to cool down toward the ambient room temperature. As the plastic cools, its volume contracts. This thermal contraction is an inherent property of all thermoplastics, defined by their Coefficient of Linear Thermal Expansion (CLTE).
The warping process occurs in stages during the printing process:
- Layer-by-layer stress accumulation: When the first layer is printed, it is held flat by the bed. However, as subsequent layers are laid down on top of it, they are extruded hot and subsequently cool and shrink. The top layers contract more than the bottom layer (which is kept warm by the heated bed). This differential contraction creates bending forces, acting like a bimetallic strip, pulling the corners of the print upward.
- Glass transition boundary: If the temperature of the lower layers drops below the plastic's Glass Transition Temperature ($T_g$), the polymer chains freeze in their contracted state, locking in these internal shear stresses. When these internal stresses exceed the physical bonding force between the plastic and the build plate, the corners peel up.
- Poor initial bed leveling: If your print bed is not perfectly level, or if your nozzle offset (Z-offset) is too high, the first layer will not be squished adequately. Without this mechanical "squish," the contact surface area between the plastic and the bed is minimized, offering very little resistance to thermal pulling forces. To verify your baseline alignment, you should refer to our step-by-step bed leveling guide.
- Ambient drafts: A cold draft from an open window or an air conditioner blowing directly on the print chamber causes uneven, rapid cooling. This rapid thermal drop intensifies the shrinkage rate, causing massive warping even on materials that are typically easy to print.
By controlling these thermal gradients and maximizing the mechanical bonding area of the first layer, you can counteract the physics of shrinkage and ensure your print remains perfectly flat from start to finish.
2. Top methods to increase 3D print bed adhesion
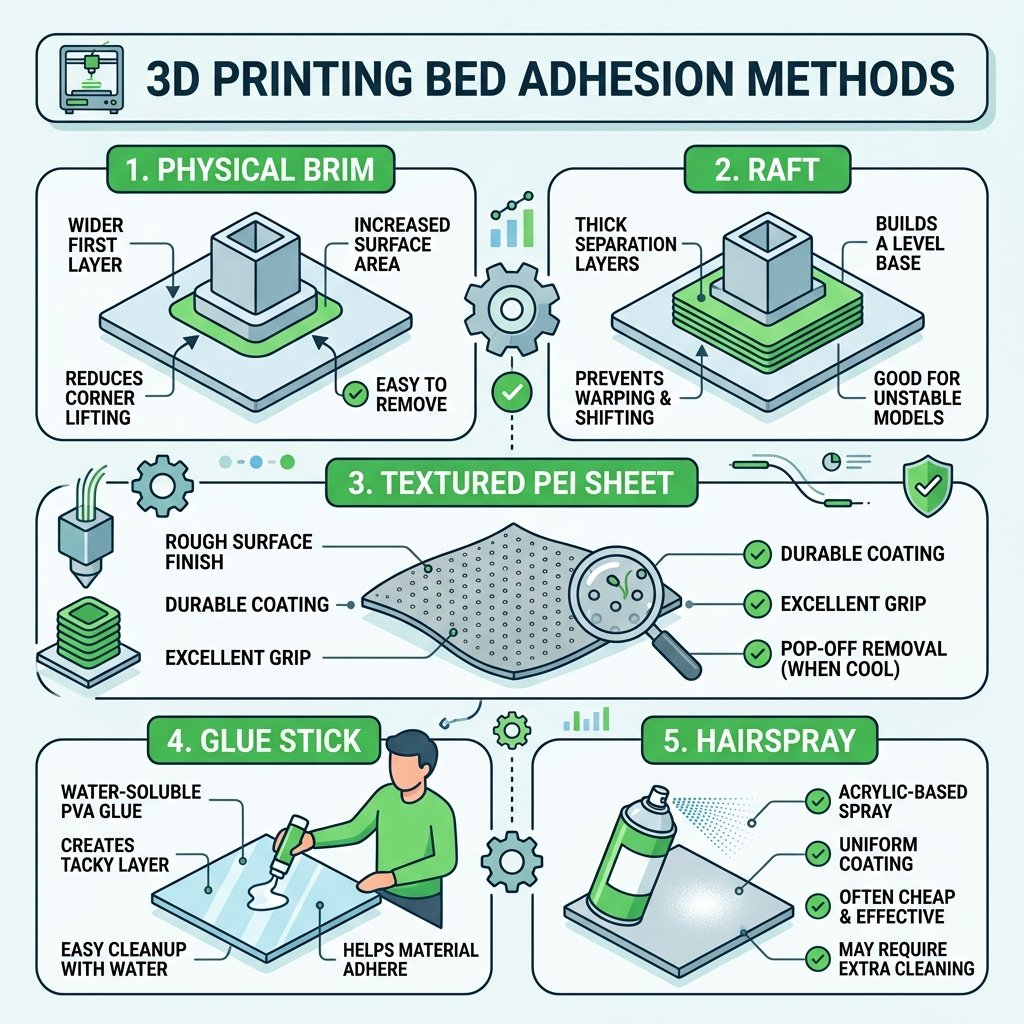
To increase 3D print bed adhesion, you must implement physical slicer additions like brims or rafts, choose the correct build plate texture, and apply specialized chemical adhesives to secure the print. These physical and chemical aids increase the contact surface area and create a strong bond that resists thermal contraction forces.
Let us break down the most effective physical and chemical methods you can use to secure your prints to the build plate. I have categorized these methods into physical surface preparation, slicing options, and chemical adhesives.
A. Slicer-Generated Adhesion Aids: Brim vs. Raft vs. Skirt
Before applying glue or changing hardware, you can adjust your slicing software (like Cura, PrusaSlicer, or Bambu Studio) to generate extra helper geometries around the base of your model:
- Brim: A brim adds a single-layer-thick flat border that extends outward from the perimeter of your model, resembling the brim of a hat. By extending the footprint of your print, a brim significantly increases the contact surface area. More importantly, it acts as a lever arm that anchors the outer corners where warping forces are strongest. Brims are highly effective, easy to remove, and conserve filament.
- Raft: A raft is a thick, multi-layer lattice structure printed underneath the model. The model is then printed on top of this raft. Rafts are highly effective because they absorb the thermal stresses of the initial layers and compensate for uneven bed surfaces. However, they consume a significant amount of filament, increase print time, and can leave a rough finish on the bottom surface of the model.
- Skirt: A skirt is a simple loop printed around the model that does not touch the part. It does not provide any bed adhesion. Its sole purpose is to prime the extruder nozzle and allow you to inspect the first layer line quality before the actual print begins.
B. Build Plate Selection: PEI, Glass, and Garolite
The physical material of your build plate is the foundation of bed adhesion. Modern printers use several common surfaces:
- Textured PEI (Polyetherimide) Sheets: Textured PEI is the gold standard for modern FDM printing. It consists of a spring steel sheet coated with a textured PEI powder. When heated, the microscopic texture grips the molten plastic mechanically. As the plate cools after printing, the plastic contracts slightly and releases automatically. It is excellent for PLA, PETG, and TPU.
- Smooth PEI Sheets: Smooth PEI offers a completely flat surface. It provides incredible molecular adhesion for PLA at normal printing temperatures. However, for sticky materials like PETG or TPU, the adhesion can be *too* strong, sometimes tearing chunks of PEI off the plate during removal unless a release agent (like glue stick) is used.
- Tempered Glass: Glass beds offer a perfectly flat surface and a glossy bottom finish. However, they are heavy, take longer to heat up, and require meticulous cleanliness. A tiny amount of dust or fingerprint oil will cause prints to release prematurely.
- Garolite (G10): Garolite is a high-pressure fiberglass laminate. It is the absolute best surface for printing nylon and polycarbonate, providing exceptional grip when heated and releasing easily when cool.
C. Chemical Bed Adhesives
When physical surfaces are not enough, chemical adhesives can bridge the gap. They work by creating a microscopic polymer layer that bonds to both the build plate and the extruded plastic:
- Glue Stick (Water-Soluble PVP): Standard school glue sticks are cheap and highly effective. They apply a thin, uniform layer of polyvinylpyrrolidone (PVP). When the bed heats up, the glue becomes slightly tacky, capturing the filament. It also acts as a useful release agent for materials that stick too well, protecting your build plate.
- Hairspray: A light mist of extra-hold hairspray on a glass or smooth PEI plate leaves a thin, acrylic-copolymer film. It is less messy than glue sticks and provides a very uniform coating. Ensure you remove the build plate from the printer before spraying to prevent the sticky mist from coating your linear rails and fans.
- Specialized 3D Printing Adhesives (Magigoo, 3D-Lac): These are liquid adhesives formulated specifically for 3D printing. They are designed to be active when hot (providing high adhesion) and become completely inactive when cold (allowing the print to pop off easily). They are cleaner than glue sticks but more expensive.
- ABS Slurry/Juice: A mixture of ABS filament scraps dissolved in acetone. When painted onto a glass bed, the acetone evaporates, leaving a thin sheet of ABS plastic. This is the ultimate adhesion method for ABS, but it can only be used on glass surfaces (acetone will dissolve PEI plates) and emits strong fumes.
"Do not use adhesives to mask a poor calibration. If your nozzle is too far from the bed, no amount of glue stick or hairspray will keep a warping print down. Adhesives are meant to enhance an already perfect first layer, not compensate for a crooked bed." — Dinu Suciu, Owner of 3D Print Book
Understanding when and how to apply these methods is key to preventing warping. Additionally, keeping your print's internal layers structurally fused is just as important as keeping them stuck to the bed. If you are experiencing weak structural parts, make sure to read our guide on how to improve 3d print layer adhesion to ensure your parts are solid throughout.
3. Temperature guidelines for different materials
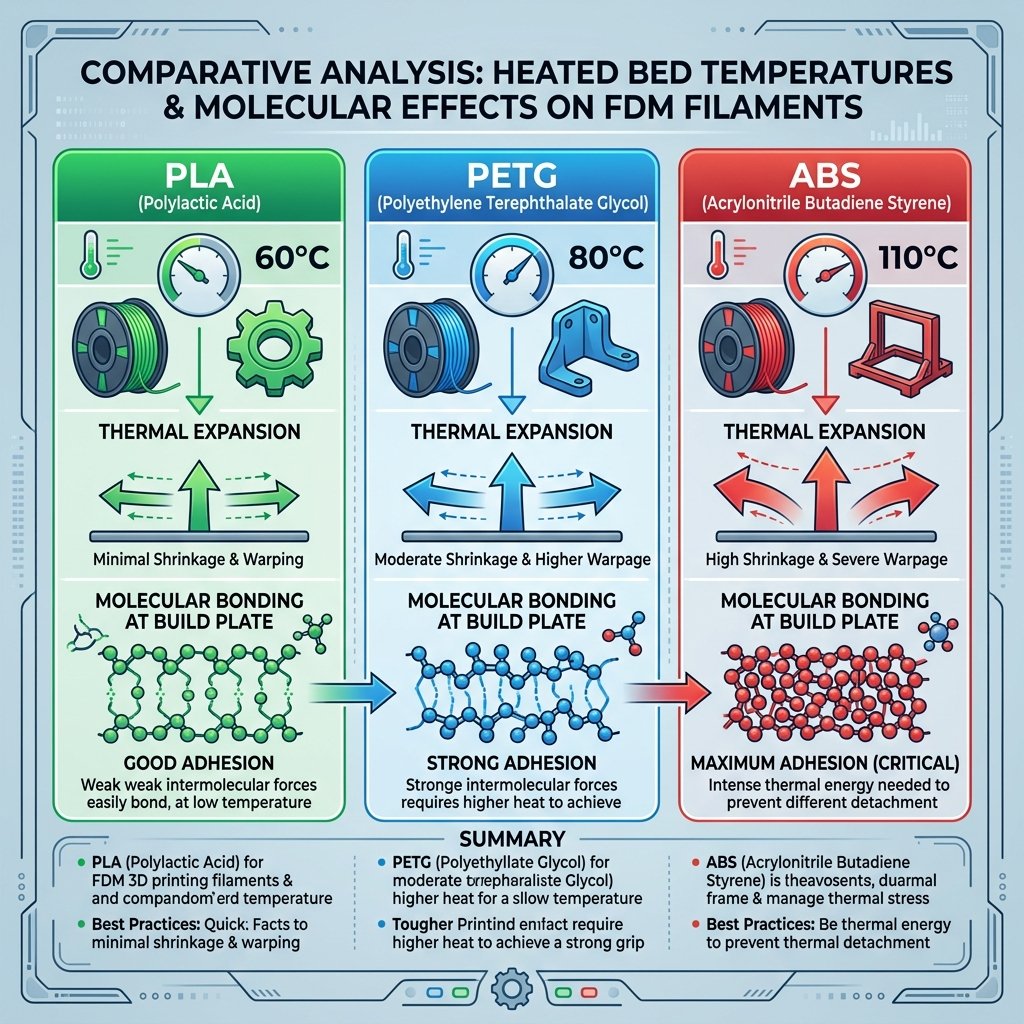
Optimal bed temperature settings depend on the specific thermoplastic material being printed: 60°C is recommended for PLA, 80°C for PETG, and 110°C for ABS or ASA. Aligning these heated bed temperatures with the material's glass transition point minimizes internal stress and stops warping.
Temperature is the single most critical factor in controlling thermal contraction. If the bed is too cold, the plastic will shrink and warp. If the bed is too hot, the plastic will remain in a semi-molten state, causing the bottom of the print to sag under its own weight, a defect known as "elephant's foot."
To keep the first layer stable, the bed temperature should be set close to or slightly above the plastic's glass transition temperature ($T_g$). This keeps the bottom layer in a slightly rubbery state, allowing the polymer chains to relax and relieve internal stresses rather than pulling upward on the corners. Once the print is finished and the bed cools down below $T_g$, the plastic contracts uniformly and releases from the plate.
Here is a detailed comparative reference table for bed temperature settings and recommended adhesion aids across common FDM materials:
| Material Type | Recommended Bed Temp | Glass Transition ($T_g$) | Best Build Surface | Recommended Adhesive | First Layer Fan Speed |
|---|---|---|---|---|---|
| PLA | 55°C – 65°C | ~60°C | Smooth or Textured PEI | None (or Light Hairspray) | 0% (Off) |
| PETG | 75°C – 85°C | ~75°C | Textured PEI | Glue Stick (as release agent) | 0% (Off) |
| ABS / ASA | 100°C – 110°C | ~105°C | Smooth PEI / Glass | ABS Slurry / Magigoo | 0% (Off) |
| TPU (Flexible) | 45°C – 60°C | ~ -50°C (rubber) | Textured PEI | Glue Stick (as release agent) | 0% (Off) |
| Nylon (PA) | 90°C – 110°C | ~60°C – 70°C | Garolite (G10) / Glass | Magigoo PA / PVA Glue | 0% (Off) |
Always turn your active cooling fan completely off (0%) for the first 2 to 3 layers, regardless of the material. Leaving the fan on during the initial layers cools the plastic too quickly, before it can flow and adapt to the microscopic textures of the build plate. This results in weak adhesion and immediate warping. Once the first few layers are established, you can gradually ramp up the fan speed to your material's standard settings.
4. Crucial Maintenance: Cleaning Your Build Surface
A clean print bed is just as important as correct temperatures. Over time, dust, plastic residue, and oils from your hands build up on the build plate. Fingerprint oils contain lipids and fatty acids that create a microscopic barrier between the hot plastic and the bed. If you touch your build plate while removing a print, you leave behind oil patches where the next print will fail to stick.
To maintain a high-performance build surface, follow these cleaning steps:
- Daily Wipe with Isopropyl Alcohol (IPA): Before starting a print, wipe down the cold build plate with a clean microfiber cloth sprayed with 90%+ IPA. This dissolves and removes surface oils and dust. Avoid using IPA on hot plates, as the alcohol will evaporate too quickly to dissolve the oils effectively.
- Deep Wash with Dish Soap and Water: Every few weeks, or when IPA stops restoring adhesion, remove the plate from the printer and wash it in the kitchen sink. Use warm water and a standard dish soap (like Dawn) that contains grease-cutting agents. Scrub the surface gently with a soft sponge (do not use steel wool or abrasive pads), rinse thoroughly with hot water, and dry it completely with a clean paper towel. Do not touch the print surface with your bare hands after washing.
- Acetone Refresh (For Smooth PEI Only): Over months of use, PEI can become oxidized or clogged with micro-plastics. A light wipe with acetone can restore the PEI surface by stripping away the oxidized layer. *Warning:* Never use acetone on textured PEI, as it will degrade and crack the textured coating. Use it sparingly on smooth PEI (no more than once a month) as it can make the plastic brittle over time.
5. Slicing Tweaks to Reduce Warping Forces
Beyond bed adhesives and temperatures, you can modify the design of your parts and slicer configurations to minimize internal stress:
- Round Your Corners: Sharp 90-degree corners concentrate thermal contraction stresses. By adding a small fillet (rounded corner) to the base of your 3D models in CAD, you distribute the stress lines uniformly, significantly reducing the likelihood of corner lifting.
- Use Helper Discs (Mouse Ears): If you do not want to print a full brim around your part, you can add small, one-layer-thick circular discs (often called mouse ears) to the sharp corners of your model. These discs anchor the critical corner points and can be easily snipped off after printing.
- Reduce Infill Density: High infill percentages (over 50%) mean there is more plastic contracting inside the model. This extra plastic exerts stronger pulling forces on the outer walls. For structural parts, consider using 15% to 30% infill with an increased number of perimeters (walls). This maintains part strength while reducing the volume of contracting plastic.
6. Frequently Asked Questions (FAQ)
Q1: Why do my FDM prints warp even when using a heated bed?
Warping occurs because plastics shrink as they cool. Even with a heated bed, if the ambient room temperature is too cold, if there are drafts, or if the first layer height is not calibrated properly (causing poor mechanical squish), the contracting forces will overcome the bed adhesion and lift the corners of the print.
Q2: Is a brim or a raft better for preventing warping on FDM prints?
A brim is generally better for most prints because it consumes less material, is easier to remove, and directly anchors the outer edges of the model to the build plate. A raft is preferred for models with very small contact areas, uneven beds, or engineering filaments like Nylon that contract heavily.
Q3: How often should I clean my PEI build plate with isopropyl alcohol?
You should wipe your PEI build plate with 90%+ Isopropyl Alcohol (IPA) before every single print. This removes finger oils and residual dust which instantly destroy bed adhesion. Every few weeks, a thorough wash with warm water and standard dish soap is recommended to strip deep oils.
Q4: Can I use hairspray or glue stick on a textured PEI plate?
Yes, you can use them, but they are rarely necessary. Textured PEI relies on thermal expansion and mechanical grip. Adhesives like glue sticks are actually used on PEI more as a release agent for sticky materials like PETG or TPU to prevent them from tearing the PEI coating, rather than to increase adhesion.
Q5: What is the best bed temperature to prevent PLA warping?
The ideal bed temperature for PLA is between 55°C and 65°C. Keeping the bed in this range ensures the plastic remains slightly soft and pliable, which relieves the residual stresses of thermal contraction without making the bottom of the print too soft (which causes elephant's foot).
About the Author: Dinu Suciu
I am Dinu Suciu, the lead technician and owner of 3D Print Book. Operating an FDM-focused 3D printing workshop, I have spent years optimizing slicer parameters and testing the physical limits of engineering filaments. My passion lies in helping designers, engineers, and makers convert digital CAD designs into robust, functional physical prototypes that perform reliably under real-world stress. If you need assistance troubleshooting a structural component or selecting the right material properties, feel free to contact me directly via our dedicated contact page.