




Functional kitchen tools rank among the most popular 3D printing ideas shared across maker communities. From custom cookie cutters, citrus juicers, and espresso funnel tampers to measuring scoops and bespoke cocktail garnishes, fabricating custom culinary accessories directly on an FDM printer is an appealing prospect. However, the intersection of desktop fused deposition modeling and food hygiene is fraught with biological and toxicological hazards that marketing spools rarely disclose.
When makers browse online filament catalogs, they frequently see spools labeled "Food Grade PLA" or "FDA-Compliant Base Resin." This marketing description often leads hobbyists and small business owners to assume that an object printed with that spool is immediately safe for preparing meals, serving drinks, or storing dry goods. In my workshop prototyping tests across various FDM machines—such as my Creality and Bambu Lab printers—I have repeatedly verified that raw extrusion chemistry tells only a fraction of the story. While virgin polylactic acid or polyethylene terephthalate pellets may possess raw biological inertness, the mechanical slicing process fundamentally converts that plastic into an unhygienic, porous matrix.
In this guide, I will break down the physical microbiology of FDM layer line crevices, examine heavy metal leaching risks from standard brass nozzles and chemical masterbatch colorants, and detail an actionable sealing protocol using certified food-grade epoxy resin under FDA 21 CFR 175.300 regulations so that your functional culinary prints remain safe for real-world use.
Table of Contents
- The Microscopic Reality of FDM Layer Grooves: Why Unsealed Prints Harbor Bacteria
- Toxic Leaching and Hidden Additives: Brass Nozzles, Masterbatch Dyes, and Plasticizers
- Comprehensive FDM Material & Hygiene Comparison Table
- FDA 21 CFR 175.300 Sealing Protocol: Food-Grade Epoxy Application
- DfAM Engineering Rules for Food-Contact Prints: Radii, Perimeters, and Infill
- Frequently Asked Questions (FAQ)
- References & External Sources
The Microscopic Reality of FDM Layer Grooves: Why Unsealed Prints Harbor Bacteria
Unsealed FDM 3D prints harbor bacteria because fused filament deposition creates microscopic peaks and valleys between consecutive extrusion beads that trap organic food residues, moisture, and microbial colonies beyond the physical reach of soap and household sponges.
To understand why a 3D printed object behaves so differently from injection-molded kitchenware, one must inspect the surface topography under optical magnification. An FDM 3D printer constructs three-dimensional geometry by laying down flattened cylindrical strands of molten plastic. Regardless of whether you slice at a 0.20mm layer height or a finer 0.12mm profile, the outer perimeter consists of curved ridges separated by narrow, V-shaped valleys termed striations.
These striations create an ideal ecological niche for bacterial proliferation due to fundamental scale discrepancies:
- Pathogen Dimensions: Common foodborne bacteria—including Escherichia coli, Salmonella enterica, Listeria monocytogenes, and Staphylococcus aureus—measure roughly 0.5 to 2.0 micrometers (microns) in length.
- Layer Crevice Dimensions: A standard 0.20mm (200-micron) layer gap possesses microscopic crevices ranging from 20 to 80 microns deep. To a single bacterium, an FDM layer line represents a massive canyon hundreds of times larger than its cell envelope.
- Capillary Action: Liquid foods, fruit juices, dairy proteins, and raw egg whites are drawn deep into these subterranean layer crevices via capillary forces, forming a nutrient-rich reservoir that cannot be dislodged by surface wiping.
Once bacterial cells settle into these microscopic voids, they exude extracellular polymeric substances (EPS) to form a resilient biofilm. This biofilm matrix physically shelters microbes from mild dishwashing detergents and surface wiping. Even if a user thoroughly scrubs a printed cookie cutter with hot soapy water, the sponge bristles—which typically measure 150 to 300 microns in diameter—simply glide over the outer peaks of the extrusion beads without ever contacting the bottom of the valleys.
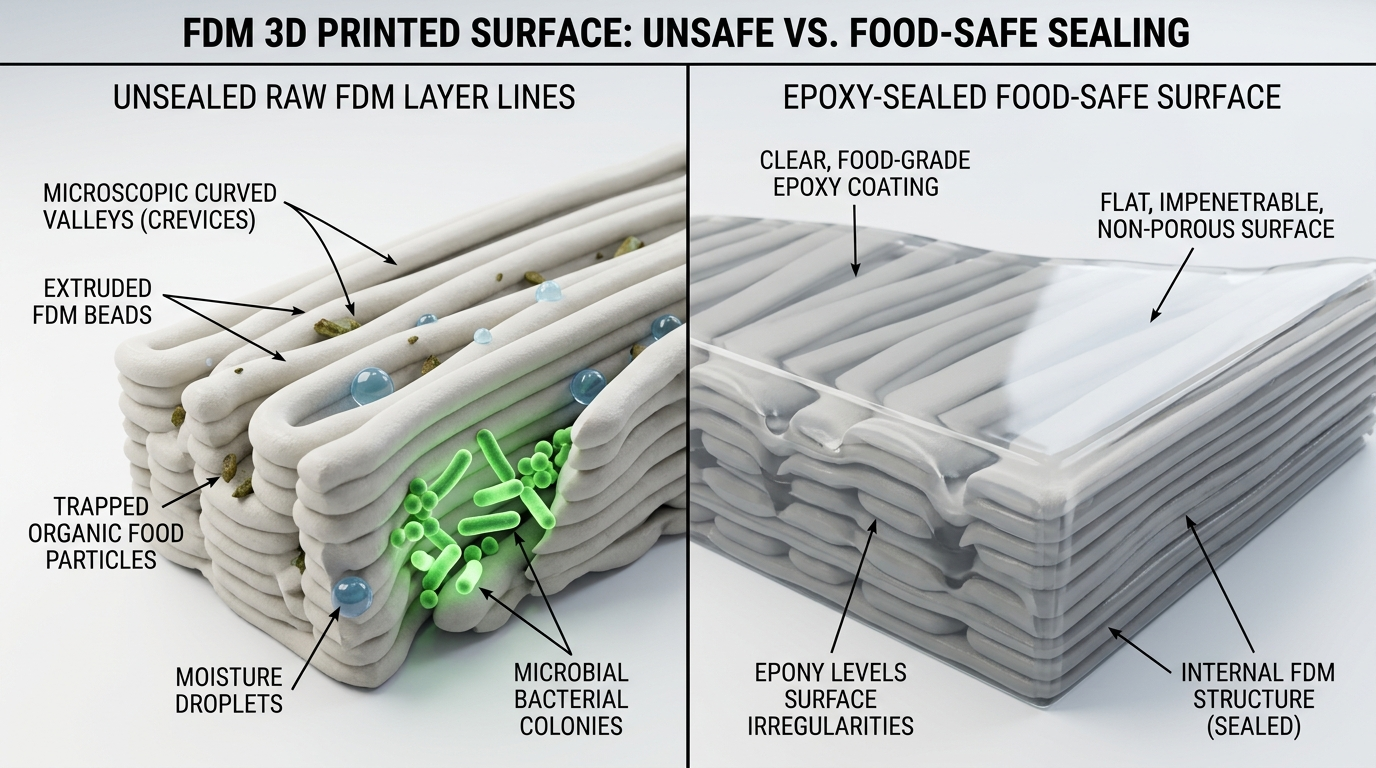
Figure 1: High-magnification cross-section comparing unsealed FDM layer grooves harboring moisture and bacterial biofilms against a hermetically sealed, food-grade epoxy barrier.
The sanitization problem is compounded by thermal limitations inherent to desktop 3D printing polymers. Commercial and residential dishwashers sanitize tableware using water temperatures exceeding 65°C to 82°C (150°F to 180°F) combined with aggressive alkaline detergents. Standard polylactic acid (PLA) has a glass transition temperature (Tg) of approximately 55°C to 60°C. Placing an unsealed PLA print into a standard dishwasher cycle causes rapid heat deflection, warping the part into an unrecognizable lump without eliminating the bacteria embedded in the core layers.
Maker's Workshop Observation: During sanitation trials in my workshop, I washed unsealed PLA and PETG measuring scoops with warm water and antibacterial soap after scooping milk powder. When inspected under an inspection loupe 48 hours later, residual organic fat deposits remained lodged inside the perimeter seam gaps and layer seams, emitting a noticeable sour odor. Household washing simply cannot purge trapped organic matter from raw FDM striations.
Toxic Leaching and Hidden Additives: Brass Nozzles, Masterbatch Dyes, and Plasticizers
Toxic leaching in FDM printing occurs when molten polymer extracts lead impurities from free-machining brass nozzles, absorbs degraded chemical residues from heated hotends, or releases uncertified masterbatch dyes into food items.
Even if the bacterial dilemma were solved, raw FDM prints introduce chemical contamination risks that arise directly from the printer's mechanical feed path and filament formulation. The journey of a plastic filament spool from raw pellet to finished print touches several potential chemical contamination vectors:
1. Lead Contamination from Free-Machining Brass Nozzles
The overwhelming majority of desktop 3D printers ship standard with yellow brass nozzles. Brass is favored by manufacturers because it boasts excellent thermal conductivity and is easy to machine. However, standard commercial brass alloys (such as CW614N or UNS C36000 free-cutting brass) deliberately contain between 1.5% and 3.5% elemental lead (Pb) to act as an internal lubricant during high-speed CNC drilling.
When molten filament pushes through a 0.4mm brass orifice at temperatures between 200°C and 260°C under high extrusion pressure, abrasive micro-friction gradually erodes the soft brass core. Microscopic lead particles and trace alloy contaminants scrape away and embed directly into the extruded exterior of the plastic bead. While this trace level of heavy metal poses negligible risk for a mechanical bracket, it presents a severe toxicological hazard when in direct contact with acidic foods—such as citrus juice, tomato sauce, or vinegar—which aggressively leach heavy metals out of matrix surfaces.
The Stainless Steel Solution: For any prototype intended to touch food, replace standard brass nozzles with a precision 303, 304, or 316L stainless steel nozzle. Stainless steel possesses lower thermal conductivity than brass—requiring you to increase hotend temperatures by roughly 5°C to 10°C—but it is completely lead-free, chemically inert, and approved under global food safety standards.
2. Uncertified Masterbatch Pigments and Chemical Additives
Virgin raw polymers—such as pure NatureWorks Ingeo biopolymer resin—often carry general FDA compliance certificates in their uncompounded pellet form. However, what arrives on your spool holder is rarely pure resin. Filament extruders blend raw pellets with complex masterbatches containing:
- Inorganic Colorants & Heavy Metal Salts: Bright yellow, orange, and red pigments historically utilized cadmium, chromium, or synthetic azo dyes that are not rated for food contact.
- Processing Aids & Lubricants: Waxes, stearates, and silicone oils added to facilitate high-speed spool winding and extruder flow.
- Impact Modifiers: Rubberizing chemical plasticizers that improve layer impact strength but can migrate into fatty or oily foods.
- Recycled Regrind (Post-Industrial Scrap): Budget filament manufacturers frequently mix virgin pellets with uncertified reground extrusion waste from prior industrial runs, introducing unknown contaminants.
Unless a filament manufacturer explicitly provides an independent third-party laboratory migration certificate verifying that the final compounded, dyed spool meets FDA 21 CFR or EU 10/2011 food contact limits, you must assume the filament contains migrating chemical additives. When producing prototypes, using unpigmented natural filament (translucent white PLA or clear PETG) minimizes additive risk, but it does not eliminate the need for surface sealing.
Comprehensive FDM Material & Hygiene Comparison Table
The following engineering matrix evaluates common desktop FDM filaments against biological safety, chemical leaching hazards, thermal properties, and practical cleanability in food-contact applications.
| Material / Approach | Bacterial Risk | Chemical Leaching Risk | Glass Transition (Tg) | Dishwasher Safe? | Practical Culinary Assessment |
|---|---|---|---|---|---|
| Standard Colored PLA (Raw) | CRITICAL (Deep porous grooves) | HIGH (Brass lead + unknown dyes) | 55°C – 60°C | NO (Severe Warping) | Unsafe for repeated food contact. Single-use dry cookie cutting only. |
| Natural Unpigmented PETG (Raw) | HIGH (Capillary layer traps) | MODERATE (Low additives, brass risk) | 75°C – 80°C | NO (Warm rinse only) | Hydrophobic and chemically resistant, but harbors bacteria in layer gaps. |
| Food-Grade Certified Polypropylene (PP) | MODERATE (Smoother bead fusion) | VERY LOW (High chemical inertness) | -10°C (Tm ~160°C) | Top Rack Only | Excellent chemical resistance, but tricky to print without chamber bed adhesion warping. |
| ABS / ASA (Raw Extrusion) | CRITICAL (Micro-voids) | CRITICAL (Styrene monomer leaching) | 100°C – 105°C | NO (Chemical Leaching) | Strictly prohibited for culinary items due to migrating toxic aromatic hydrocarbons. |
| Epoxy-Coated FDM (FDA 21 CFR 175.300) | VERY LOW (Smooth glass barrier) | VERY LOW (Fully cross-linked resin) | 80°C – 110°C (Cured) | Hand Wash Only | The gold standard for FDM: Completely seals crevices and encapsulates heavy metal traces. |
| Food-Grade Platinum Silicone Casting | NONE (Zero porosity) | NONE (Medical/Culinary Grade) | > 200°C Heat Limit | YES (Full Cycle Safe) | Use 3D print as a mold master, cast with certified silicone for ultimate safety. |
FDA 21 CFR 175.300 Sealing Protocol: Food-Grade Epoxy Application
Applying an FDA 21 CFR 175.300 compliant food-grade epoxy coating seals FDM parts by flowing into inter-layer valleys, eliminating surface porosity, and creating a continuous, non-toxic barrier that transforms a raw 3D print into a washable, hygienic vessel.
In industrial food processing, the United States Food and Drug Administration regulates polymeric surface treatments under Title 21 of the Code of Federal Regulations, Part 175, Section 300 (abbreviated as FDA 21 CFR 175.300: Resinous and polymeric coatings). This regulation defines testing criteria for substances that can be safely used as food-contact surfaces on metal, ceramic, or composite substrates without releasing harmful extractives.
To safely bridge the gap between hobbyist FDM printing and culinary utility, applying a certified food-grade epoxy resin (such as Max CLR, ArtResin, or Alumilite Amazing Clear Cast compliant with 21 CFR 175.300) is the most reliable, field-tested method. Follow this step-by-step workshop protocol:
Step 1: Mechanical Surface Preparation
Begin with a clean print produced using natural, unpigmented PETG or PLA. Thoroughly inspect the print for loose strings, surface burrs, or blobs. Perform a light wet-sanding pass using 320-grit waterproof sandpaper to knock down sharp perimeter ridges without penetrating outer wall loops. Rinse the print thoroughly with distilled water and let it dry completely. Degrease the entire component using 99% pure isopropyl alcohol (IPA) on a lint-free microfiber cloth to remove skin oils and workshop dust.
Step 2: Precision Stoichiometric Weighing
Standard household epoxy crafts often use volumetric mixing ratios ("eyeballing" two equal liquid lines). In food-safe applications, volumetric mixing is dangerous. Epoxy resins cross-link through precise chemical stoichiometry; an excess of unreacted Part A (epoxy monomer) or Part B (amine hardener) will remain mobile inside the polymer matrix and leach toxic compounds into liquids.
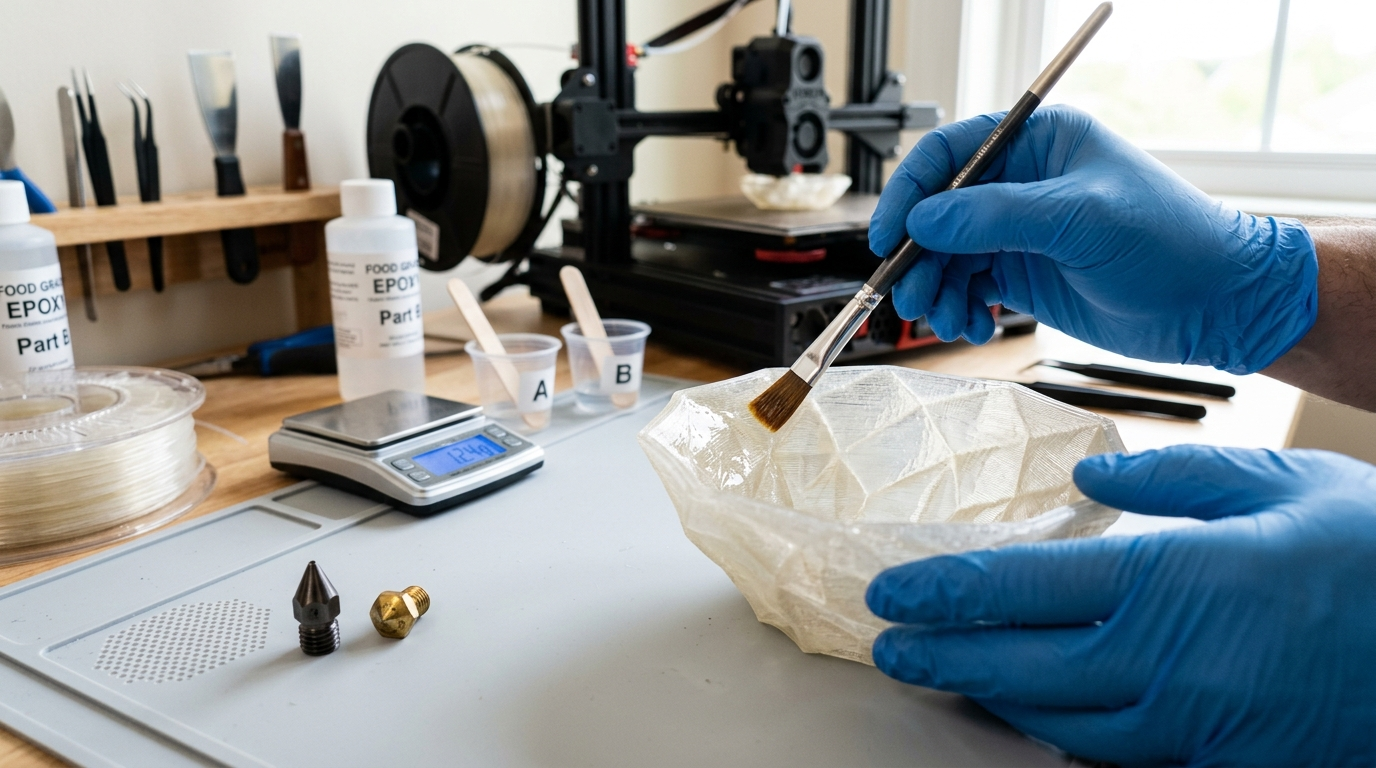
Figure 2: Precision workshop coating protocol: applying stoichiometric FDA food-grade epoxy with a fine bristle brush alongside stainless steel nozzle upgrades on a silicone clean mat.
Always use a digital micro-scale accurate to 0.01 grams. Weigh Part A and Part B exactly according to the manufacturer's technical data sheet (TDS). Mix slowly using a flat-edged wooden stir stick for a minimum of 3 to 4 minutes, deliberately scraping the bottom and sides of the mixing cup to prevent unblended pockets. Avoid vigorous whipping to minimize micro-bubble entrapment.
Step 3: Degassing and Thin Film Application
If you own a vacuum degassing chamber, degas the mixed epoxy at 29 inHg for 5 minutes to boil out dissolved air bubbles. If a vacuum chamber is unavailable, allow the mixed batch to stand undisturbed for 3 minutes, then pass a heat gun on low heat across the liquid surface to pop rising bubbles.
Using a clean, synthetic flat brush, apply a continuous, thin coat of epoxy over all food-contact surfaces. Work from bottom to top, allowing the low-viscosity resin to wick into the micro-striations via surface tension. Maintain a coating thickness of approximately 0.3mm to 0.5mm. Too thick a coat will cause drips and pooling; too thin a coat may leave microscopic high spots unsealed. Mount the part on a rotating turntable or rotate it manually every 10 minutes during the first hour of room-temperature cure to prevent gravitational sagging.
Step 4: The 72-Hour Full Cure Cycle
A common error is handling or washing the coated part as soon as the epoxy feels tack-free (usually 12 to 24 hours). A tack-free epoxy is not a fully cross-linked polymer. While it feels solid, chemical conversion may stand at only 75% to 85%, meaning unreacted monomers remain volatile.
- Ambient Curing: Allow the coated piece to cure undisturbed at a minimum room temperature of 21°C to 24°C (70°F to 75°F) for a full 72 hours.
- Post-Cure Thermal Acceleration: If permitted by the epoxy TDS and your base substrate's glass transition limits, an elevated post-cure (e.g., 40°C for 4 hours for PLA, or 60°C for PETG) drives chemical conversion beyond 98%, maximizing solvent resistance and surface hardness.
- Initial Wash: After the 72-hour window, wash the glossy surface with mild dish soap and warm water (not hot) before its first culinary contact.
"When makers ask me whether they can 3D print a functional coffee mug or cocktail shaker, my answer is always rooted in chemistry: unsealed FDM is a microbial sponge, but a properly mixed, stoichiometric FDA-compliant epoxy coating transforms the print into an impenetrable, glass-hard composite." — Dinu Suciu, Founder of 3D Print Book
DfAM Engineering Rules for Food-Contact Prints: Radii, Perimeters, and Infill
Design for Additive Manufacturing (DfAM) for culinary tools requires eliminating sharp internal angles, increasing perimeter wall counts to prevent internal moisture intrusion, and replacing hollow lattice infill with 100% solid cross-sections.
Good food safety starts inside your CAD software before the slicing engine ever generates G-code. If you design a part with deep 90-degree internal pockets, no amount of post-processing will prevent dried flour, grease, or bacterial moisture from becoming permanently lodged in corners. Apply these three structural DfAM principles:
1. Generous Internal Radii (Minimum 4.0mm Fillets)
Never leave sharp 90-degree acute internal corners on food-facing geometry. In CAD, model large generous fillets with a minimum radius of 4.0mm to 6.0mm along all internal intersections, floor-to-wall transitions, and handle joints. A rounded concave corner allows liquid epoxy coatings to flow smoothly without meniscus pooling, and it enables soft cleaning sponges to maintain continuous physical contact across the entire inner contour.
2. Maximizing Solid Wall Perimeters (4 to 6 Loops)
Standard mechanical prints typically use 2 or 3 wall loops to save material. In a culinary prototype, 2 wall loops create a fragile barrier. Micro-pinholes or pressure drops at retraction points can allow liquid to seep past the outer perimeter into the hollow internal infill structure. Once water penetrates the internal infill chamber, it becomes trapped permanently, cultivating mold and anaerobic bacteria inside the core of the print.
Configure your slicer (such as Orca Slicer or PrusaSlicer) with at least 5 to 6 outer wall loops. Better yet, for smaller items like cups, measuring spoons, and tampers, print with 100% rectilinear or concentric infill. A 100% solid plastic body leaves no internal air voids for trapped moisture, increasing structural density and eliminating leak pathways even if the outer surface suffers micro-abrasion over time. Refer to our guide on optimizing slicer wall loops and perimeter ordering for practical extrusion setting tips.
3. The Silicone Mold Workaround for Complex Kitchen Tools
For intricate culinary models that are difficult to seal with brush-applied epoxy—such as chocolate molds, decorative ice trays, or textured butter stamps—the safest and most professional engineering strategy is to treat your FDM printer purely as a tooling machine. 3D print the positive master model, post-process the surface smooth with primer and wet-sanding (see our complete post-processing guide for makers), and pour two-part food-grade platinum-cure silicone over the printed master.
Platinum-cure silicone (such as Smooth-On Sorta-Clear 37) cures into a flexible, 100% non-porous, dishwasher-safe mold capable of withstanding temperatures up to 230°C. This allows you to produce intricate culinary items with zero bacterial trapping risk, zero lead exposure, and commercial-grade hygiene compliance.
Frequently Asked Questions (FAQ)
1. Can I safely use 3D printed cookie cutters on raw baking dough?
Raw 3D printed cookie cutters can be used safely under strict conditions: print them using natural, unpigmented PLA with a stainless steel nozzle, use them only on dry or low-moisture chilled dough, and treat them as single-use or short-term accessories. Because raw dough contains fats, sugars, and raw egg proteins that become trapped in layer lines, wash them immediately in cold water without abrasive scrubbing. For commercial bakery production, seal the cutters with food-grade epoxy or cast them from silicone molds.
2. Does printing with 100% infill make an FDM part completely waterproof and food-safe?
No. While 100% infill prevents liquids from penetrating into internal hollow lattices, it does not alter the surface topography. The exterior of the part still features microscopic layer line grooves (20–80 microns deep) that harbor bacteria and resist sanitary cleaning. Solid infill improves mechanical integrity and prevents internal water accumulation, but surface sealing with food-grade epoxy remains mandatory for hygienic food contact.
3. Can I run food-safe 3D printed parts through a residential dishwasher?
No, desktop 3D printed parts should not be cleaned in a dishwasher. Dishwasher sanitization cycles reach 65°C to 82°C (150°F to 180°F), which easily exceeds the glass transition temperature of PLA (55°C) and softens PETG (75°C), leading to severe distortion, warping, and micro-cracking of epoxy barrier coatings. Food-grade epoxy-coated FDM prints must be washed by hand using warm water, mild liquid dish soap, and a soft, non-abrasive sponge.
4. What makes stainless steel nozzles safer than standard brass nozzles?
Standard commercial brass nozzles contain 1.5% to 3.5% lead to facilitate high-speed factory machining. As molten filament passes through the orifice at high pressure, microscopic lead particles are scraped from the brass bore and deposited onto the outer perimeter of the print. Stainless steel nozzles (grades 303, 304, or 316L) are completely lead-free, chemically non-reactive, and comply with international food contact standards.
5. Are natural, unpigmented filaments safer for food contact than colored filaments?
Yes. Natural, unpigmented filaments contain virgin polymer resins without added synthetic colorants, heavy metal pigment salts, or specialized gloss additives. While natural filaments still require surface sealing to eliminate microbial growth in layer line crevices, they eliminate the risk of chemical dye migration and toxic pigment leaching into food.
References & External Sources
- eCFR Title 21 CFR 175.300: Resinous and Polymeric Coatings for Food Contact Surfaces
- Prusa Research Technical Guide: How to Make Food-Safe 3D Prints
- Formlabs Engineering Guide to Food Safe 3D Printing & Regulatory Standards
About the Author: Dinu Suciu
I am Dinu Suciu, founder and lead prototyping technician at 3D Print Book. Operating an FDM-focused workshop with high-speed CoreXY machines and precision direct-drive setups, I specialize in polymer engineering, slicer profile optimization, and functional prototyping. My technical guides focus on practical, lab-tested maker techniques designed to help 3D printing enthusiasts achieve durable, safe, and professional results. Have questions about material safety or custom prototyping? Contact me directly via our Contact Page.