




Monetizing digital design work has historically presented a dilemma for 3D creators: release files for free on open repositories to gain community exposure, or gate models behind paid marketplaces where traffic remains limited. With the launch of the $1,000,000 Nexprint Creator Fund by hardware manufacturer Elegoo, 3D designers and maker hobbyists now have a direct cash incentive path to earn up to $100 per verified original model while still distributing downloadable files to an expanding global user base.
As 3D printer hardware matures toward high-speed CoreXY platforms and multi-color toolheads, user adoption depends heavily on the quality and printability of available models. Elegoo introduced Nexprint as their central platform for sliced print profiles, open-source designs, and functional maker assets. Unlike traditional platforms that rely strictly on download point tokens or voluntary digital tips, the Nexprint Creator Fund operates on direct monetary grants, rewarding original model uploads, high-demand functional tools, and verified print profiles through a dedicated pool replenished each month.
This technical breakdown explains how the fund operates, the step-by-step verification workflow required by manual evaluators, the role of physical print photos and sliced 3MF files, and how to maximize approval rates under current platform guidelines.
Join the Nexprint Creator Fund Program
Ready to upload your original 3D designs and earn cash rewards? Create your account today to activate your creator profile and start submitting models to the $1,000,000 fund.
Join the Nexprint Creator Fund NowTable of Contents
- What Is Nexprint and How Does It Fit the Elegoo Ecosystem?
- How the $1,000,000 Nexprint Creator Fund Operates
- Reward Tiers: Base Payouts, Quality Bonuses, and Up to $100 Per Model
- Eligibility Requirements: Original Models, Physical Photos, and Slicer Profiles
- Step-by-Step Guide: Setting Up Your Profile and Submitting Models
- Maximizing Model Visibility: Tags, Assembly Guides, and Community Engagement
- Slicer Integration: Creating Print-Ready 3MF Files in OrcaSlicer and Elegoo Slicer
- Common Submission Mistakes That Lead to Rejection
- Frequently Asked Questions (FAQ)
What Is Nexprint and How Does It Fit the Elegoo Ecosystem?
Nexprint serves as Elegoo's dedicated 3D model repository and print profile ecosystem, designed to bridge CAD modelers, slicing software, and physical FDM machines into a unified workflow.
For several years, 3D printer manufacturers treated online model repositories as secondary discussion forums. However, with the rise of modern cloud slicers and high-speed motion systems, the repository has evolved into a vital infrastructure layer. Users expect one-click slicing, tested filament settings, and verified geometries that print without layer shifts or bed detachment. Nexprint was built to fulfill this role across Elegoo's extensive hardware line—including the Neptune series and Centauri platforms—while remaining open to models sliced for third-party FDM machines.
The platform integrates directly with popular slicer forks such as Elegoo Slicer and OrcaSlicer. Instead of downloading a bare STL file, manually setting layer heights, configuring support angles, and guessing cooling profiles, users can download complete .3mf project archives. These files contain embedded geometry, plate layouts, infill densities, and cooling thresholds tuned by the designer. For creators, this integration means higher print success rates and fewer user complaints regarding failed overhangs or weak layer bonding.
How the $1,000,000 Nexprint Creator Fund Operates
The Nexprint Creator Fund is a structured $1,000,000 monetary reserve allocated in monthly funding windows to distribute cash rewards to verified designers who publish original 3D models.
Rather than distributing the entire fund in a single promotional burst, Elegoo structures the incentive across repeating monthly cycles. At the start of each calendar month, a fresh quota of the fund unlocks. Verified submissions are reviewed on a first-come, first-served basis until the monthly allocation cap is reached. Once the monthly threshold closes, subsequent approved models roll into the verification queue for the following cycle.
This cyclic allocation structure encourages steady publishing habits rather than bulk dumping of outdated CAD files. Designers who consistently test, slice, and publish high-utility designs each week tend to capture a reliable share of the monthly pool before the cap is exhausted. The review team evaluates submissions based on practical utility, aesthetic quality, documentation clarity, and proof of successful physical fabrication.
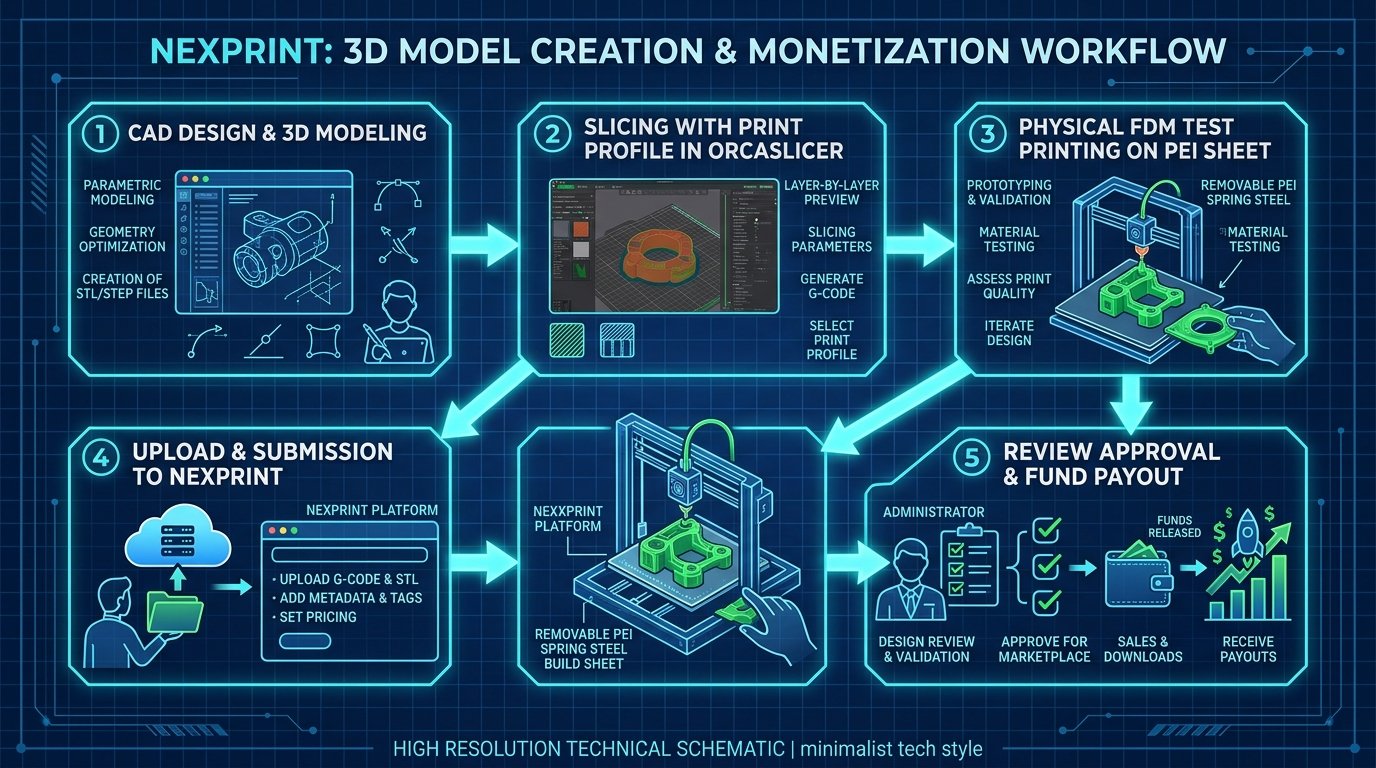
Figure 1: Complete model production and review pipeline for the Nexprint Creator Fund.
Reward Tiers: Base Payouts, Quality Bonuses, and Up to $100 Per Model
Payouts under the Nexprint Creator Fund scale according to design originality, modeling complexity, print profile readiness, and community adoption, reaching up to $100 per model for top-tier original contributions.
The platform separates model compensation into distinct incentive layers:
- Base Approval Reward: Awarded when a newly submitted model passes initial manual verification. Historically starting at $5 per approved model, this baseline confirms that the file is printable, original, and includes an unedited photograph of a real physical print.
- Quality and Innovation Bonuses: For designs demonstrating advanced engineering—such as print-in-place linkages, compliant mechanisms, functional shop tools, or multi-part assemblies with calibrated tolerances—the editorial team issues quality multipliers that can raise single-model earnings to $20, $50, or up to $100.
- Download Milestones and Featured Placements: Models that generate significant community engagement, high download counts, and verified print profile ratings are eligible for featured banner slots on the repository homepage and additional platform reward grants of up to $300 during campaign rounds.
- Monthly Cap per Creator: To ensure equitable distribution across the community and prevent automated spam farming, the platform sets a reasonable upper threshold on total payouts an individual creator account can claim per monthly cycle.
| Reward Category | Estimated Earnings | Core Eligibility Criteria | Verification Requirement |
|---|---|---|---|
| Standard Approved Model | $5 per model | Original geometry, basic utility or decor, clean mesh without non-manifold errors | Physical print photograph on PEI build plate + 3MF/STL files |
| High-Quality Functional Model | $15 – $50 per model | Complex assemblies, print-in-place mechanisms, precise tolerances, assembly guide | Detailed print settings, filament specs, multi-angle physical verification |
| Flagship Original Design | Up to $100 per model | Exceptional innovation, original IP, comprehensive 3MF profiles, broad community utility | Editorial board selection, print profile validation, zero copyright overlap |
| Community Engagement Bonus | Platform badges & rewards | High verified print success rate, active community support in comments | Verified print profile downloads and 5-star print ratings |
Eligibility Requirements: Original Models, Physical Photos, and Slicer Profiles
Strict submission guidelines safeguard the fund from scrapers, digital-only mockups, and low-effort remixes, requiring proof of physical FDM production for every entry.
Many new contributors submit 3D models only to find their submissions rejected during manual audit. Understanding the specific compliance criteria prevents wasted printing time and repeated re-submissions:
1. Proof of Physical Fabrication (The No-Render Rule)
Digital 3D rendering in Blender, KeyShot, or CAD preview windows is acceptable as a supplementary thumbnail, but it cannot be the primary verification image. The review team requires at least one crisp, well-lit photograph showing the actual model physically printed on an FDM machine build plate. The photo must display visible layer lines, genuine surface texture (such as a textured PEI pattern on the base), and realistic ambient workshop lighting. Submissions relying exclusively on 3D computer renders are declined automatically.
2. Original Intellectual Property vs. Commercial Remixes
The Creator Fund prioritizes original creations. Re-uploading existing open-source designs from other repositories with minor dimensional tweaks does not qualify for base fund payouts. If a submission is an authorized remix of an open-source model under a compatible Creative Commons license (e.g., CC BY or CC BY-SA), the creator must explicitly credit the upstream author, link to the source file, and demonstrate substantial functional improvement. Outright copies of trademarked characters, brand logos, or patented mechanisms are disqualified immediately.
3. Verified Slicer Profiles (.3MF)
While uploading bare STL or STEP files is standard practice across legacy repositories, Nexprint prioritizes pre-configured .3mf project files. The project file must contain calibrated slicing parameters tailored for standard nozzle diameters (typically 0.4mm), appropriate infill densities (15% to 25% gyroid or cross-hatch), sensible perimeter counts, and tested support geometry if overhangs exceed 45 degrees.
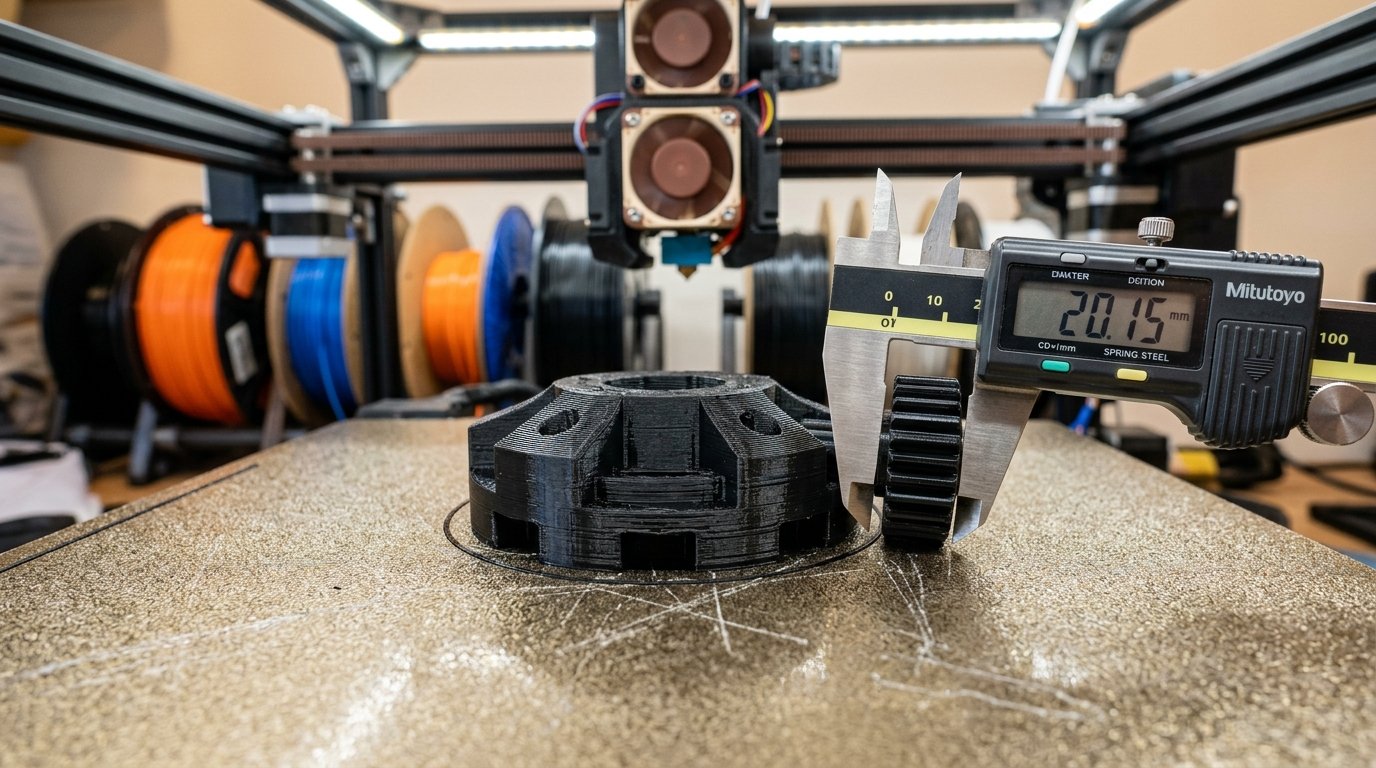
Figure 2: Real physical verification on a textured PEI plate with measured tolerances—a primary requirement for Creator Fund approval.
Step-by-Step Guide: Setting Up Your Profile and Submitting Models
Navigating the submission process methodically ensures that your models pass manual review without multiple revision requests from platform evaluators.
Follow this five-step walkthrough to get started:
Step 1: Create an Account via the Creator Portal
Begin by creating your creator account through the official portal. Completing registration activates your designer profile and links your account directly to the Creator Fund verification system.
Start Earning on Nexprint Today
Click below to register your Elegoo account, access the Nexprint repository portal, and start submitting your printable designs to the $1,000,000 fund.
Join the Nexprint Creator Fund NowStep 2: Complete Your Creator Profile
Set a professional username, add a clear avatar, and write a concise bio explaining your design specialty (such as functional workshop organization, tabletop models, or parametric mechanical parts). Profiles with complete bios and clear descriptions establish greater trust during editorial review.
Step 3: Export Clean Geometry and 3MF Projects
Export your design in STEP format for CAD users alongside standard high-resolution STL meshes. Open your model in OrcaSlicer or Elegoo Slicer, orient the part to maximize bed contact and minimize support requirements, slice it with a standard 0.20mm layer profile, and export the job as a .3mf file.
Step 4: Photograph Your Physical Print
Print the file in standard PLA or PETG on a clean build sheet. Take 2 to 4 high-resolution photos in good lighting. Include one photo showing the model directly on the build plate right after printing finishes, and at least one shot displaying the model in practical use or assembly.
Step 5: Fill in Metadata and Submit for Review
When creating the listing on Nexprint, provide a descriptive title, write a thorough explanation of recommended print settings (temperatures, layer heights, infill patterns), select accurate tags, upload your STL and 3MF files, and submit the listing into the review queue. Manual evaluations typically conclude within 3 to 7 business days.
Maximizing Model Visibility: Tags, Assembly Guides, and Community Engagement
Reaching the highest reward tiers and earning additional community bonuses depends on how well your model listings communicate assembly instructions and print requirements to users.
A repository thrives when makers can effortlessly reproduce parts on their own machines without guesswork. Platform evaluators and community members consistently favor models that provide complete project documentation:
- Exploded CAD Renders & Fastener Callouts: For multi-part mechanical designs, include an exploded view diagram or a numbered graphic showing part relationships. List required non-printed hardware explicitly (such as standard M3 hex socket-head cap screws, 608 bearings, or neodymium magnets).
- Filament and Nozzle Recommendations: Specify the exact materials tested in your workshop (e.g., standard PLA, PETG, or ABS). If the model requires dimensional creep resistance or UV stability for outdoor use, explain why PETG or ASA should be chosen over PLA.
- Descriptive Search Tags: Avoid generic single-word tags like "tool" or "3D". Instead, use specific functional descriptors such as "hex-bit-holder", "gridfinity-storage", "spool-roller", or "cable-management". Accurate tagging ensures your design surfaces naturally in user searches and recommended feeds.
- Active Comment Response: When downloaders share print pictures, provide feedback, or request custom tolerances in your comment section, responding promptly builds community goodwill and signals to reviewers that your portfolio is actively maintained.
Slicer Integration: Creating Print-Ready 3MF Files in OrcaSlicer and Elegoo Slicer
Configuring proper slicer metadata within 3MF project archives significantly increases model download volume and editorial approval ratings.
When downloading models on Nexprint, modern users increasingly filter by the availability of native print profiles. Uploading bare STLs forces every user to re-orient parts, configure seams, and test bridge speeds independently. In contrast, a well-calibrated 3MF project file stores comprehensive configuration data:
- Part Orientation & Support Minimization: Orient planar surfaces flat against the build plate to maximize adhesion on textured PEI sheets. Where overhangs exceed 50 degrees, configure slim tree supports (organic supports) with a 0.20mm Z top contact distance for effortless manual peeling without scarring the model surface.
- Seam Placement: Move the Z-seam to rear corners or sharp geometric edges using the "Aligned" or "Corner" seam option. Visible layer seams running down cylindrical surfaces lower perceived part quality.
- Wall Count and Mechanical Strength: For functional mounts or tool holders, set perimeter wall counts to 3 or 4 loops rather than relying strictly on dense infill. Increasing perimeter count from 2 to 4 boosts torsional and shear strength substantially while keeping print times manageable.
- Filament and Temperature Profiles: Set standard baseline temperatures (such as 210°C nozzle and 60°C bed for standard PLA; 235°C nozzle and 75°C bed for PETG) that ensure compatibility across the widest possible range of open FDM hardware.
Common Submission Mistakes That Lead to Rejection
Avoiding standard submission errors ensures your models move smoothly through manual evaluation without falling into the pending-revision queue.
Reviewers screen hundreds of model submissions daily. The most frequent causes of rejection include:
- Submitting AI Renders or Pure CAD Screen Grabs: Reviewers require physical photographic proof. Submitting pure digital renders without a real printed part is the single fastest way to receive an immediate rejection notice.
- Blurry, Dark, or Grainy Photos: Photographs taken in dim lighting, out of focus, or displaying heavy stringing and spaghetti failure artifacts give the impression of unvalidated geometry. Ensure your print is clean, well-lit, and sharply captured.
- Non-Manifold or Broken Mesh Topologies: STLs with inverted normals, self-intersecting shells, or unclosed holes often slice improperly, leading to missing layers in third-party slicers. Always inspect your model in your slicer preview tab to confirm solid slicing before uploading.
- Copyright Infringement and Unlicensed Trademarks: Models featuring automotive logos, famous anime characters, commercial movie props, or patented brand emblems are systematically purged to protect platform compliance. Focus on original utility, workshop tools, custom mechanical gadgets, and unique artistic designs.
- Vague Descriptions: A title like "Box" paired with a one-sentence description gives neither the reviewer nor the downloader sufficient context. Specify model dimensions, hardware requirements (such as M3 bolts or heat-set inserts), print times, and material recommendations.
Frequently Asked Questions (FAQ)
1. How are Creator Fund earnings paid out?
Earnings from approved models and quality bonuses accumulate within your creator wallet balance on the platform. Payout disbursements are handled via digital payment processors such as PayPal or direct bank transfer once minimum withdrawal thresholds are met and identity verification is completed.
2. Do I retain the copyright and intellectual property rights to my designs?
Yes. Uploading models to Nexprint grants the platform a non-exclusive license to host, display, and distribute the files to users, but you retain core ownership of your original CAD files. You are free to cross-post your designs to personal portfolios or other non-exclusive repositories unless specific commercial agreements state otherwise.
3. Can I submit multiple variations of the same model?
Submitting minor variations (such as slightly different screw hole sizes or scaled duplicates) as separate standalone listings is discouraged and often flagged as listing spam. The recommended approach is to package multiple sizes or variants into a single comprehensive model listing with multiple plate options.
4. Is the Creator Fund limited exclusively to owners of Elegoo 3D printers?
No. While Nexprint is organized by Elegoo, any 3D creator can join the fund and upload original models. You do not need to own an Elegoo printer to design models, slice them in OrcaSlicer, print physical test pieces on any FDM machine, and claim creator fund rewards.
5. Why must photographs show the physical print rather than digital renders?
Physical photos guarantee that the model is genuinely printable under standard FDM conditions. Digital CAD models can easily hide impossibly thin walls, floating islands, or zero-clearance interlocking joints that jam during physical printing. A physical photo proves the geometry has been validated in the real world.
6. How often is the $1,000,000 Creator Fund replenished?
The total prize pool is managed on a monthly recurring quota basis. At the beginning of each calendar month, fresh funding unlocks for new submissions. Submitting your verified models early in each monthly cycle ensures faster evaluation before that month's allocation threshold is reached.
Ready to Monetize Your 3D Designs?
Join the Nexprint community today. Create your account using the official portal link below to access the Creator Fund and start earning up to $100 per verified original model.
Join the Nexprint Creator Fund Now