
Rhythmic horizontal ripples on tall vertical walls often look like bent Z-axis leadscrews or loose belts, yet the real culprit is frequently hiding inside your temperature graph. Uncalibrated hotends and bang-bang heated beds swing several degrees above and below target, flexing aluminum plates and shifting filament viscosity layer by layer.
Running an automated firmware PID tune is one of the fastest steps in FDM 3D printer calibration, usually taking 10 to 15 minutes from a terminal console or touchscreen menu. Once tuned, the heater controller stops reacting late with full-power bursts and instead modulates power smoothly to hold nozzle and bed temperatures within fractions of a degree.
In my workshop, PID calibration sits right alongside checking extrusion flow and running 3D print quality test models whenever I swap a nozzle, replace a silicone sock, or rebuild a toolhead. If you've already tightened belts and ruled out CoreXY belt tension artifacts, stabilizing your heater loops is often the missing fix that turns banded outer walls into clean surfaces.
Table of Contents
- Understanding Thermal Hysteresis: Bang-Bang vs. PID Control
- How Bed Temperature Swings Create Z-Axis Banding Artifacts
- Executing M303 PID Calibration for Hotends and Heated Beds in Marlin
- Running PID_CALIBRATE in Klipper (Mainsail and Fluidd)
- Firmware PID Calibration & Heating Control Matrix
- Saving PID Values to EEPROM and Testing Under Real Fan Load
- When PID Tuning Won't Fix Your Temperature Swings
- Maker's Workshop Note: Measuring Banding Before and After Bed PID
- Frequently Asked Questions (FAQ)
- References & External Sources
Understanding Thermal Hysteresis: Bang-Bang vs. PID Control
Bang-bang heating switches a heater completely on until the thermistor crosses the target temperature and completely off until it cools down, while PID control uses proportional, integral, and derivative math to throttle PWM power smoothly and keep temperatures steady within roughly ±0.2°C to ±0.5°C.
Many entry-level bed-slingers and older firmware builds still ship with bang-bang control enabled on the heated bed by default, even when the hotend already uses PID. That choice made sense years ago on weak 8-bit boards or mechanical relay setups, because bang-bang doesn't toggle a MOSFET rapidly. On modern 32-bit boards with solid-state MOSFETs, though, bang-bang turns the bed into a slow thermal sawtooth.
Thermal inertia makes bang-bang worse than it sounds on paper. When a 24V aluminum bed hits 60.0°C and the firmware cuts power, residual heat stored inside the silicone pad or PCB trace keeps pushing the surface upward to 62°C or 63°C. By the time the thermistor reads 59.8°C and kicks full wattage back on, the plate keeps dropping to 58°C before turning around. That repetitive overshoot and undershoot cycle is thermal hysteresis.
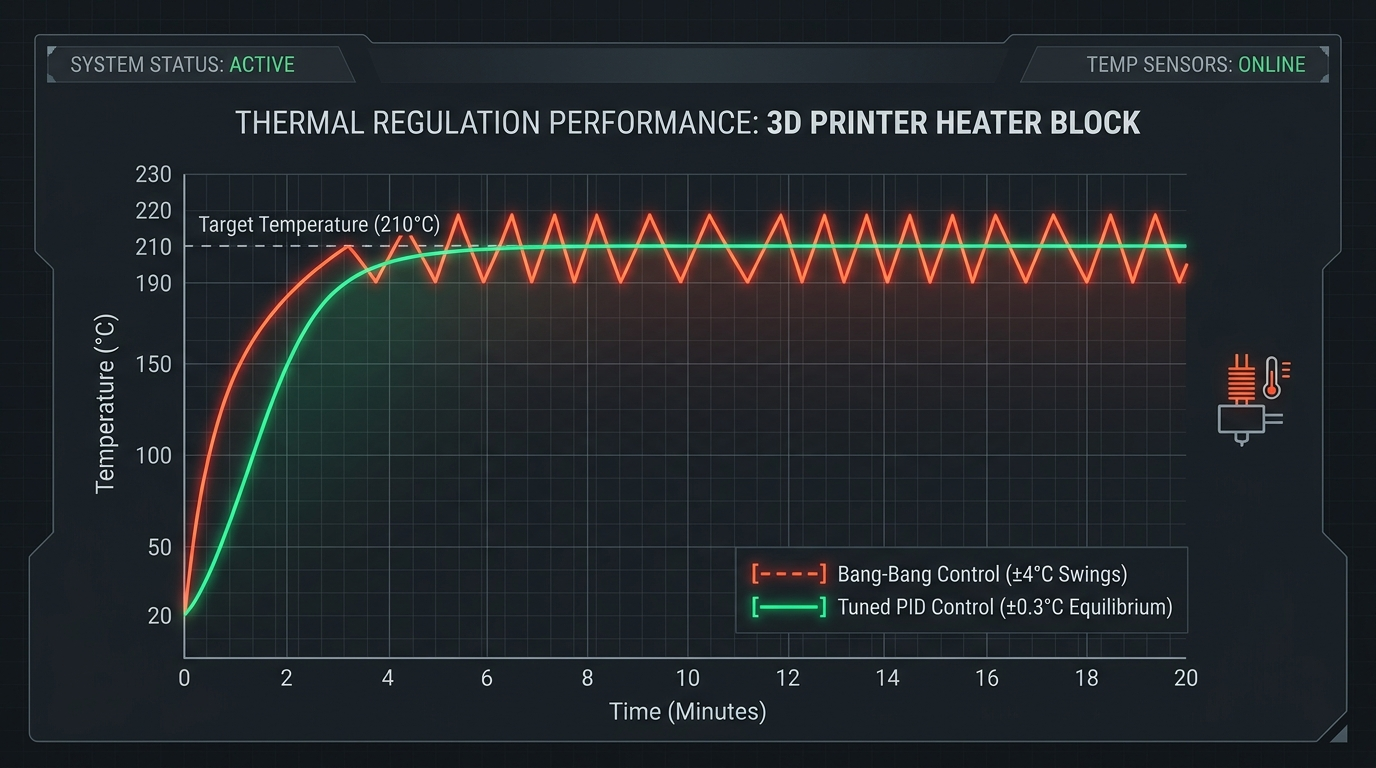
Figure 1: Bang-bang heating produces repeating ±3°C to ±5°C thermal waves, whereas a properly tuned PID loop dampens overshoot and locks onto the target line.
A Proportional-Integral-Derivative (PID) controller replaces on/off guessing with three coordinated terms calculated every fraction of a second:
- Proportional (Kp): Pushes heater power in direct proportion to how far the current temperature sits from your setpoint. Far below 210°C, Kp demands high duty cycle; as the nozzle approaches 205°C, Kp backs off smoothly.
- Integral (Ki): Watches steady-state error over time. If ambient room air or a 100% part-cooling blower constantly pulls the nozzle 1.2°C short of target, Ki gradually adds a bias offset until the average lands dead-on 210.0°C.
- Derivative (Kd): Measures the rate of temperature change to act like a shock absorber. When the heater is climbing rapidly toward target, Kd applies early braking so the block doesn't overshoot, and when a cooling fan blasts on at Layer 2, Kd reacts instantly to catch the dip.
Even when PID is enabled from the factory, stock Kp, Ki, and Kd numbers are generic averages. Changing from a brass nozzle to hardened steel, losing a silicone sock, upgrading a heater cartridge from 40W to 60W, or enclosing an open printer shifts the toolhead's thermal mass enough that factory constants begin to oscillate.
How Bed Temperature Swings Create Z-Axis Banding Artifacts
Repeated heated bed temperature swings cause the aluminum build plate to expand upward and contract downward by tens of microns on every heating cycle, visibly squishing and stretching consecutive layer widths into uniform horizontal bands across vertical print walls.
Most users assume Z-banding only comes from crooked leadscrews, dirty Z-rods, or eccentric POM wheels. Mechanical binding certainly causes horizontal ridges, and you can review those hardware checks in our common FDM troubleshooting fixes. Yet thermal Z-banding has a distinct fingerprint that mechanical charts rarely show.
Look closely at the spacing of the horizontal lines on a tall vertical cylinder. Mechanical Z-wobble from an 8 mm leadscrew pitch always repeats cleanly every 8.0 mm of print height, regardless of how wide or narrow the model is. Thermal banding from a bang-bang heated bed repeats on a time interval instead of a fixed millimeter pitch.
- Narrow Columns vs. Wide Boxes: If a bed cycles every 90 seconds, a narrow calibration tower that prints quickly will show widely spaced vertical ripples, while a wide flat box that takes three minutes per layer will show tightly packed bands—or uneven bands where layer times vary.
- Gloss Shift on Nozzle Swings: Hotend PID oscillation rarely bends the frame, but a ±4°C swing at the nozzle changes molten polymer viscosity and surface sheen. On glossy PETG or silk PLA, poorly tuned hotend PID often shows up as alternating shiny and slightly matte horizontal rings wrapping around the part.
- First-Layer and Detachment Risk: On larger beds running at 80°C to 100°C for PETG or ASA, a 4°C drop during a bang-bang trough can shrink the PEI spring steel sheet enough to stress corners and promote warping on tall prints.
Checking your printer's temperature chart in Mainsail, Fluidd, or OctoPrint makes diagnosis effortless. A healthy tuned hotend draws a flat line with less than ±0.3°C ripple once settled, and a PID-tuned bed tracks within ±0.2°C. If either graph looks like ocean waves or a jagged sawtooth while printing, it's time to run autotune.
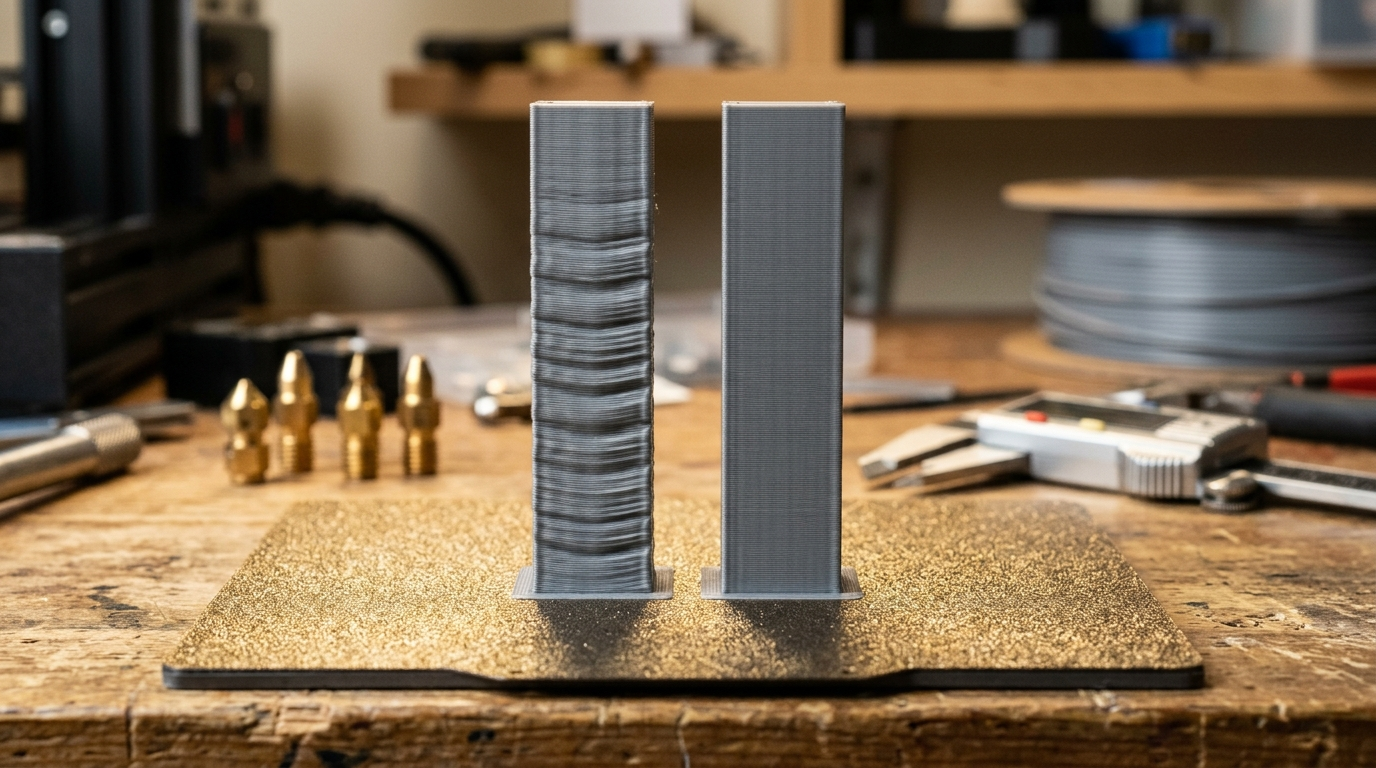
Figure 2: Side-by-side PLA test specimens printed on the same mechanical frame—thermal bed cycling leaves periodic horizontal ridges (left) that disappear once bed PID control is calibrated (right).
Executing M303 PID Calibration for Hotends and Heated Beds in Marlin
In Marlin firmware, sending M303 with the heater index, target temperature, and cycle count runs an automated heating loop that outputs tuned Kp, Ki, and Kd constants ready to save via M301, M304, and M500.
Before starting, confirm how you'll talk to the printer. Some newer Marlin touchscreens include a built-in PID Autotune menu under Configuration or Temperature settings. For printers without that menu—including many Ender-series machines, custom Marlin builds, and budget bed-slingers—connecting a laptop over USB with Pronterface or using OctoPrint's Terminal tab gives you full control and lets you read the exact returned numbers.
Start with the hotend, and tune it under the same airflow conditions your printer sees mid-print. That means keeping the silicone sock installed and turning the part-cooling fan on to your normal working speed (for example, 100% for PLA, or 50% if you print mostly PETG) right before launching the test:
M106 S255          ; Set part-cooling fan to 100% (omit or use S128 for PETG/ABS)
M303 E0 S215 C8 U1 ; Tune hotend 0 at 215°C for 8 cycles and apply immediately
M500               ; Save the new PID constants permanently to EEPROM
Here is what each parameter tells Marlin to do:
E0selects the primary hotend (extruder 0). On multi-nozzle machines,E1targets the second toolhead.S215sets the calibration setpoint in degrees Celsius. Pick the temperature you print most often—usually 210°C–215°C for PLA, or 240°C–245°C for PETG.C8runs 8 full oscillation cycles instead of the default 5. Eight cycles take only two extra minutes and give noticeably steadier Ki and Kd averages.U1automatically loads the final calculated values into active RAM as soon as the test finishes, saving you from mistyping decimals.
Next, tune the heated bed using E-1. Keep in mind that Marlin must have PIDTEMPBED compiled in firmware for bed PID commands to work; if the terminal returns echo:PIDTEMPBED disabled or an unknown heater error, your stock firmware build is locked to bang-bang unless you flash updated Marlin or switch to Klipper.
M303 E-1 S60 C8 U1 ; Tune heated bed at 60°C for 8 cycles and apply
M500               ; Save bed PID constants to EEPROM
If your printer omits U1 support or you prefer reviewing the values first, watch the terminal output when PID Autotune finished! appears. You'll see three lines similar to Kp: 21.45, Ki: 1.68, and Kd: 68.40. Enter them manually with M301 P21.45 I1.68 D68.40 for the hotend or M304 P74.10 I12.85 D284.50 for the bed, followed immediately by M500.
One subtle detail catches people off guard with M303 on high-wattage beds: large 300 × 300 mm plates heat up and cool down slowly. If Marlin hits a heating timeout watchdog during a slow bed cycle, start the bed tune from ambient temperature rather than a hot bed, or run C5 cycles with the chamber doors closed so the bed cools predictably without triggering a thermal protection halt.
Running PID_CALIBRATE in Klipper (Mainsail and Fluidd)
Klipper replaces Marlin's numeric M303 codes with a single human-readable PID_CALIBRATE console command that automatically measures thermal response and writes the resulting parameters into the bottom auto-generated block of printer.cfg when you execute SAVE_CONFIG.
If you run a Voron, Creality K1 series, Elegoo Centauri, or any Klipper-converted bed-slinger via Mainsail or Fluidd, you don't need external terminal software. Open the web dashboard in your browser, go to the Console widget, and let the heaters start near room temperature.
For the hotend, turn your part-cooling fan on first (many makers run 50%–100% depending on material, using M106 S128 or the dashboard slider) so the PID loop accounts for cooling airflow across the nozzle tip, then run:
M106 S128
PID_CALIBRATE HEATER=extruder TARGET=220
Wait until Klipper reports that calibration is complete and outputs lines showing pid_Kp, pid_Ki, and pid_Kd. Don't restart the printer yet—those new numbers only live temporarily until saved. Run:
SAVE_CONFIGExecuting SAVE_CONFIG tells Klipper to back up your previous printer.cfg, write the new PID constants into the protected #*# <---------------------- SAVE_CONFIG ----------------------> section at the bottom of the file, and restart the Klipper host service cleanly.
Once the hotend cools slightly or right after the restart, run the same workflow for the heated bed:
PID_CALIBRATE HEATER=heater_bed TARGET=60
SAVE_CONFIG
If you regularly switch between 60°C PLA plates and 100°C ASA enclosed prints, calibrate your bed at an intermediate or primary temperature—say 65°C for general PLA/PETG work, or 95°C if your machine lives enclosed printing ABS/ASA. Klipper's bed PID loop handles a ±20°C offset from its tuned setpoint smoothly as long as it isn't fighting open-door drafts.
What about closed-ecosystem appliance printers like Bambu Lab X1C, P1S, or A1 models? Those machines don't expose raw G-code PID commands in normal operation. Instead, they run proprietary thermal routines inside their onboard Calibration menu (or automatic heater self-checks during full printer calibration). Triggering that built-in calibration menu after replacing a hotend assembly or ceramic heater performs the equivalent thermal stabilization step without needing console commands—one reason these machines rank highly in our best FDM 3D printer 2026 roundup.
Workshop Rule: Always tune your hotend with the silicone sock installed and your part-cooling fan running at typical print speed. Tuning a bare hotend with zero fan airflow creates overly aggressive PID gains that often trigger overshoot or thermal faults the second your cooling blower ramps up on Layer 2.
Firmware PID Calibration & Heating Control Matrix
The comparison matrix below summarizes how different FDM printer firmwares handle hotend and bed heating, which commands trigger calibration, and what common pitfalls to watch for during testing:
| Firmware / Control Mode | Hotend Command | Heated Bed Command | Permanent Save Method | Key Workshop Caveat |
|---|---|---|---|---|
| Bang-Bang (Legacy Bed) | Usually PID (rarely bang-bang) | No tuning available (fixed hysteresis) | Hardcoded in firmware | Produces ±3°C to ±5°C cycles and visible horizontal Z-banding on tall walls |
| Marlin (USB / OctoPrint) | M303 E0 S215 C8 U1 |
M303 E-1 S60 C8 U1 |
M500 (or LCD Store Settings) |
Bed PID fails unless PIDTEMPBED was enabled when firmware was compiled |
| Prusa Firmware (MK3 / MK4) | LCD: Calibration > PID Calibration | Managed internally via firmware profile | Auto-saved to EEPROM on finish | Run in a draft-free room above 20°C; won't fix swings larger than ±5°C |
| Klipper (Mainsail / Fluidd) | PID_CALIBRATE HEATER=extruder TARGET=220 |
PID_CALIBRATE HEATER=heater_bed TARGET=60 |
SAVE_CONFIG |
Manual edits to pid_Kp above the auto-save block get ignored if SAVE_CONFIG exists |
| Closed Appliance (Bambu Lab) | Onboard Menu: Device Calibration | Onboard Menu: Device Calibration | Auto-stored internally | No manual M303 console access; run full calibration after swapping hotend parts |
Workshop Sourcing Tip: Silicone Socks, Hotend Spares & Consistent Filaments
Rock-solid thermal control depends as much on intact hardware—like fresh silicone heater socks, reliable thermistors, and clean nozzles—as it does on firmware math. Once your bed and hotend hold temperature within ±0.3°C, pairing that stability with diameter-consistent PLA, PETG, or ASA spools makes surface tuning noticeably easier. Before paying full retail for replacement hotends, spare nozzles, or multi-spool filament bundles, check our verified 3D Printing Deals & Coupons page, or inspect official printers and spare parts directly below:
Saving PID Values to EEPROM and Testing Under Real Fan Load
Sending M500 in Marlin or SAVE_CONFIG in Klipper writes your calculated PID values to non-volatile memory; without that save step, the very next power cycle silently reverts your printer to its oscillating factory defaults.
Forgetting to save is easily the most common mistake when running PID calibration for the first time. In Marlin, M303 ... U1 only loads the numbers into active RAM for the current session. Always follow up by sending M500, then send M503 immediately afterward and read the console echo to verify that your new M301 and M304 numbers actually stuck.
If your printer throws an error saying EEPROM is disabled—common on some stripped-down stock mainboards—you have two reliable workarounds:
- Add M301 / M304 to Slicer Start G-Code: Paste your exact
M301 P... I... D...andM304 P... I... D...lines near the top of your Machine Start G-code in Orca Slicer, PrusaSlicer, or Cura. Every sliced file will inject your tuned PID constants right before heating begins. - Use an SD Card G-Code File Without USB: If you don't have a laptop near the printer, create a plain text file named
pid_tune.gcodeon your SD card containingM303 E0 S215 C8 U1on line 1 andM500on line 2, then "print" it from the screen. Just remember that without a serial monitor, you won't see the returned numbers unless EEPROM saves automatically viaU1andM500.
In Klipper, double-check that you don't have duplicate manual pid_Kp lines sitting inside your main [extruder] or [heater_bed] section while also having an auto-generated SAVE_CONFIG block at the bottom. Clean out any old manual entries if you want to inspect things clearly, or simply rely on PID_CALIBRATE + SAVE_CONFIG so Klipper manages the commented overrides automatically.
Once saved, run a quick verification test instead of jumping straight into a 10-hour print. Heat the nozzle to 215°C and the bed to 60°C, wait two minutes for temperatures to settle, and then toggle your part-cooling fan from 0% to 100%. Watch the temperature graph for 60 seconds: a brief 1°C to 2°C dip that recovers smoothly within 10–15 seconds without bouncing wildly past 217°C confirms your PID loop is healthy.
When PID Tuning Won't Fix Your Temperature Swings
PID tuning cannot compensate for broken thermistor wires, loose heater cartridges, missing silicone socks, or failing MOSFETs; if your temperature jumps erratically by more than ±5°C in single-second spikes, stop tuning and inspect the physical wiring first.
A healthy thermal problem looks smooth and rhythmic on a graph. A hardware failure looks jagged, erratic, or sudden. Running M303 over a dying thermistor just forces the heater through unnecessary high-heat cycles and frequently ends with a Thermal Runaway shutdown halfway through the test.
Check these four physical parts before blaming PID constants:
- Missing or Torn Silicone Sock: A bare aluminum heater block loses heat rapidly when a twin-5015 or high-flow blower kicks in at 100%. If the heater cartridge has to jump from 45% to 95% duty cycle instantaneously, even the sharpest PID constants can lag behind and trigger a thermal runaway halt. Put a fresh snug-fitting silicone boot back on before calibrating.
- Loose Thermistor Retaining Screw or Broken Bead Lead: On classic V6 or MK8 aluminum blocks, overtightening the tiny M3 screw that clamps the glass thermistor wire crushes the PTFE insulation and causes intermittent shorts when the toolhead moves along X. Gently wiggle the thermistor wires near the heater block at room temperature while watching the idle reading; if the number spikes to -14°C or 350°C, replace the thermistor cartridge.
- Heater Cartridge Set Screw Backing Out: Thermal expansion and retraction vibration can loosen the grub screw holding the cylindrical heater cartridge inside the block. Poor metal-to-metal contact traps heat inside the cartridge while the block lags behind, fooling the PID loop into wild oscillation.
- Unseated Bed Thermistor or Pinched Bed Cable: On bed-slingers where the Y-axis bed harness flexes thousands of times per print, fatiguing copper strands inside the bed thermistor leads create rapid 5°C–10°C phantom jumps whenever the bed travels to the back corner.
Keep in mind one other trigger for re-tuning: nozzle material changes. Switching from a high-conductivity brass nozzle to a lower-conductivity hardened steel tip alters how quickly heat leaves the block under high extrusion flow, making a quick 8-cycle re-tune worthwhile whenever you permanently change nozzle alloys.
Maker's Workshop Note: Measuring Banding Before and After Bed PID
In my workshop tests on a Klipper-converted direct-drive bed-slinger (with a 235 × 235 mm cast aluminum bed and textured PEI spring steel sheet) alongside my Creality K1C, I tested how much surface roughness actually comes from heater cycling versus mechanics. I printed a simple 35 mm × 120 mm tall hollow cylinder in matte gray Polymaker PolyLite PLA (215°C hotend, 60°C bed, 0.20 mm layer height, 2 outer walls) before and after running heated bed PID calibration.
Baseline Run (Bang-Bang Bed + Generic Hotend Defaults):
Watching the Mainsail temperature graph during the 55-minute print showed the bed cycling steadily between 58.6°C and 62.1°C roughly every 75 seconds, while the hotend drifted between 213.4°C and 216.8°C whenever cooling fan bridges kicked on. Under raking overhead LED light, the finished PLA cylinder showed subtle, evenly spaced horizontal ridges every ~3.2 mm—matching the 75-second thermal wave rather than the 8 mm Z-leadscrew pitch.
Post-Calibration Run (Klipper PID_CALIBRATE on Both Heaters):
I ran PID_CALIBRATE HEATER=extruder TARGET=215 with the part-cooling fan at 100%, saved with SAVE_CONFIG, and followed with PID_CALIBRATE HEATER=heater_bed TARGET=60 (which took roughly 11 minutes to settle across the thermal mass of the aluminum plate). On the exact same G-code file afterward, the hotend held between 214.8°C and 215.2°C, and the heated bed stayed locked between 59.9°C and 60.1°C. Inspecting the second gray PLA cylinder under the same raking light showed the periodic 3.2 mm ripples were gone, leaving uniform, consistent layer stacking from bottom to top.
One Practical Catch I Noticed:
On my Creality K1C running high-speed PETG (245°C hotend, 80°C bed), running hotend PID calibration with the chamber fan off and then turning the side auxiliary fan on during the print still caused a temporary 2.8°C droop on Layer 3. Re-running PID_CALIBRATE at 245°C with my normal 40% part cooling active eliminated that droop completely on the next test block.
Frequently Asked Questions (FAQ)
1. How often should I run PID tuning on my FDM 3D printer?
You don't need to run PID tuning every week. Run it once during initial setup, and re-run it whenever you change a thermal component—such as swapping between brass and hardened steel nozzles, replacing a heater cartridge or thermistor, installing a new silicone sock, adding an enclosure, or changing cooling duct airflow.
2. Should the part-cooling fan be on or off during hotend PID calibration?
In most cases, run hotend PID tuning with the part-cooling fan turned on at your usual printing speed (typically 50% to 100% for PLA, or 30% to 50% for PETG). Tuning with real airflow teaches the PID loop how much cooling load the nozzle experiences mid-print, preventing sudden temperature drops on Layer 2.
3. What target temperature should I pick if I print both PLA and PETG?
Pick the temperature you use most frequently—or split the difference near 225°C–230°C if you alternate daily between 210°C PLA and 245°C PETG. A single well-tuned PID profile handles a ±20°C window accurately on most FDM hotends without needing separate presets.
4. Why does my heated bed take so long to finish PID tuning?
Heated beds have much larger thermal mass than compact aluminum hotend blocks, so each heating and cooling oscillation cycle takes noticeably longer. Expect 8 to 15 minutes for a standard 235 × 235 mm bed, and up to 20 minutes on larger 300 × 300 mm or AC-powered plates.
5. Can I run PID tuning on a Bambu Lab P1S, X1C, or A1?
Bambu Lab printers don't use open Marlin M303 or Klipper PID_CALIBRATE console commands. Instead, trigger the built-in full device calibration routine from the printer's touchscreen or Bambu Studio Device tab whenever you replace a hotend assembly or notice temperature instability.
Related Guides & Next Steps

FDM 3D Printer Bed Leveling & Calibration Guide
Master 3D printer bed leveling. Learn manual and automatic leveling techniques, how to set Z-offset, and fix first-layer issues for perfect 3D prints.
Fixing VFA & CoreXY Belt Tension Tuning Guide
Learn how to diagnose and fix Vertical Fine Artifacts (VFA) on high-speed CoreXY FDM 3D printers through frequency belt tuning and speed optimization.
References & External Sources
- Marlin Firmware Documentation: M303 PID Autotune G-Code Reference
- Marlin Firmware Documentation: M500 Save Settings to EEPROM
- Klipper Official Documentation: Configuration Checks & PID Calibration
- Klipper Official Documentation: G-Codes & Extended PID_CALIBRATE Command
About the Author: Dinu Suciu
I am Dinu Suciu, founder and prototyping specialist at 3D Print Book. Operating an active maker workshop equipped exclusively with desktop FDM 3D printers—including enclosed CoreXY machines and direct-drive bed-slingers—I focus on mechanical tolerances, thermal calibration, and repeatable slicer workflows for functional parts. Have a question about printer tuning or custom prototyping? Reach out directly through our Contact Page.